Setting input and output location
In this section, we will explore the process of adding and editing the input and output source location details in the TruCap+ application. You can easily configure the input and output locations to streamline the document processing work flow.
By defining input and output locations, TruCap+ streamlines the entire document processing work flow, ensuring efficient data extraction and easy management of processed documents. This functionality simplifies the document intake process, enhances data accuracy, and facilitates better information utilization for businesses and organizations.
Accessing input / output setup
In the main menu, under Application Setup, click Input / Output Setup. The Input / Output Setup page opens with 2 tabs Input and Output.
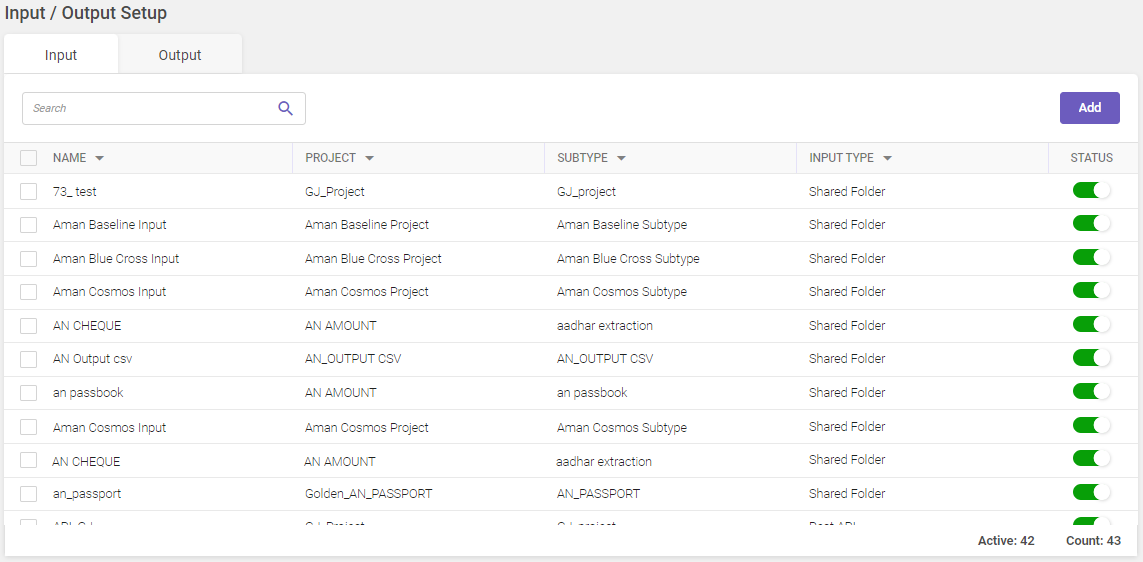
Column header descriptions
|
COLUMN NAME |
DESCRIPTION |
|---|---|
|
Name |
Displays the input source name. |
|
Project |
Displays the project name. |
|
Subtype |
Displays the document subtype name. |
|
Input Type |
Displays the input type name. |
|
Status |
Displays the active/inactive status of the input source location. The bottom-right corner of the Input/Output Setup page displays the total count and active input sources available. |
To set up an input location, refer Setting input source location.
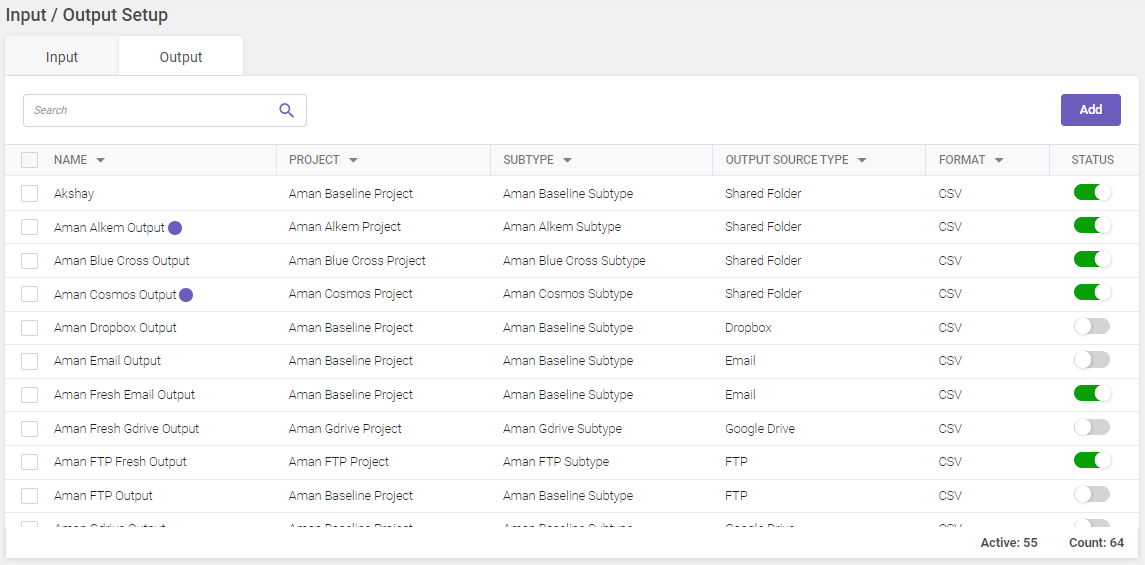
Column header descriptions
|
COLUMN NAME |
DESCRIPTION |
|---|---|
|
Name |
Displays the output source name. More |
|
Project |
Displays the project name. |
|
Subtype |
Displays the document subtype name. |
|
Output Source Type |
Displays the output type name. |
|
Format |
Displays the output document format type. |
|
Status |
Displays the active/inactive status of the output source location. The bottom-right corner of the Input/Output Setup page displays the total count and active input sources available. |
 icon indicates that Include Original/Processed file toggle switch is active for that output source.
To set up an output location, refer Setting output source location.
Setting input source location
An input location refers to a designated source location where the application's users, typically the customers, place the documents that need to undergo data processing. These documents can be in various formats, such as scanned images, PDFs, or other digital documents. TruCap+, the document processing system, fetches the documents from this input location to initiate the data extraction process. For example
Note:
-
Multiple input source types can be linked to a single subtype.
-
If the number of active input sources created by a user is more than 50, then there is some delay in starting the input services as the input services have to validate all 50 input sources. If it is more than 100, it will take some more time to start the input services.
-
In case of any modifications done after setting an input source, for the changes to take effect, disable the input source, wait for the time set as per the service refresh time interval, and then enable the input source or restart the input source service after making the modifications.
To add input locations, follow these steps:
-
Navigate to the Input tab within the Input / Output Setup page. In the top-right corner of the page, click the Add button to initiate the adding input location process. The Add Input Location window opens with two tabs Input details and Input type and parameters.

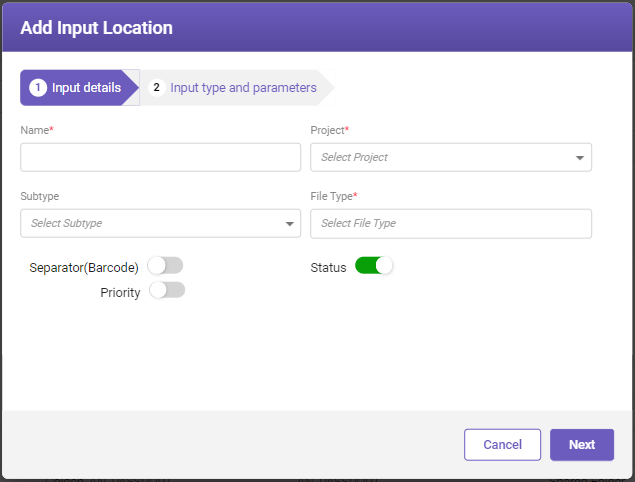
-
Under Input details tab, fill-in the details based on the following field descriptions.
|
FIELD |
DESCRIPTION |
|---|---|
|
Name* |
Enter the name of the input file. A maximum of 30 characters is permitted for the name. |
|
Project* |
Select the project from the drop-down list. |
|
Subtype |
Select subtype of the data from the drop-down list. |
|
Define the type of files that can be uploaded for processing. Supported file types include PDF, JPG, PNG, TIFF, BMP, ZIP, DOC, XPS, XLS, and TXT. Select an appropriate file type checkbox from the drop-down list. Note TXT files are treated differently – they are converted into searchable PDF copies and processed accordingly. Certain services will treat TXT files as PDFs for handling, while retaining certain limitations.
|
|
|
Separator(Barcode) |
Enable the toggle button to use barcode as a document separator. Documents will be automatically split based on barcodes during processing. |
|
Status |
Enable the toggle button to activate or deactivate the input file for processing. |
|
Priority |
Enable the toggle button to prioritize the processing of documents from this input source and subtype. Note
|
|
* Mandatory fields |
|
-
Once you've filled in the input details, click Next to proceed to the Input type and parameters tab.
Note:
It is mandatory to fill in the required fields under the Input details tab before accessing the Input type and parameters tab.
-
Under Input type and parameters tab, select the required input source type from the Input source type* drop-down list. The available fields will change based on the selected input source type.
Refer to Input source types section to learn more about setting up and configuring different input source types available in TruCap+.
Input source types
Below is the list of the available input source types in TruCap+ with their explanation.
Google Drive is a cloud-based storage service provided by Google that allows users to store and access their files, including documents, images, and videos. It also offers collaborative features, making it easy to share and collaborate on files with others. With TruCap+, you can configure Google Drive as an input source to fetch and process documents.
Configuring Google Drive
-
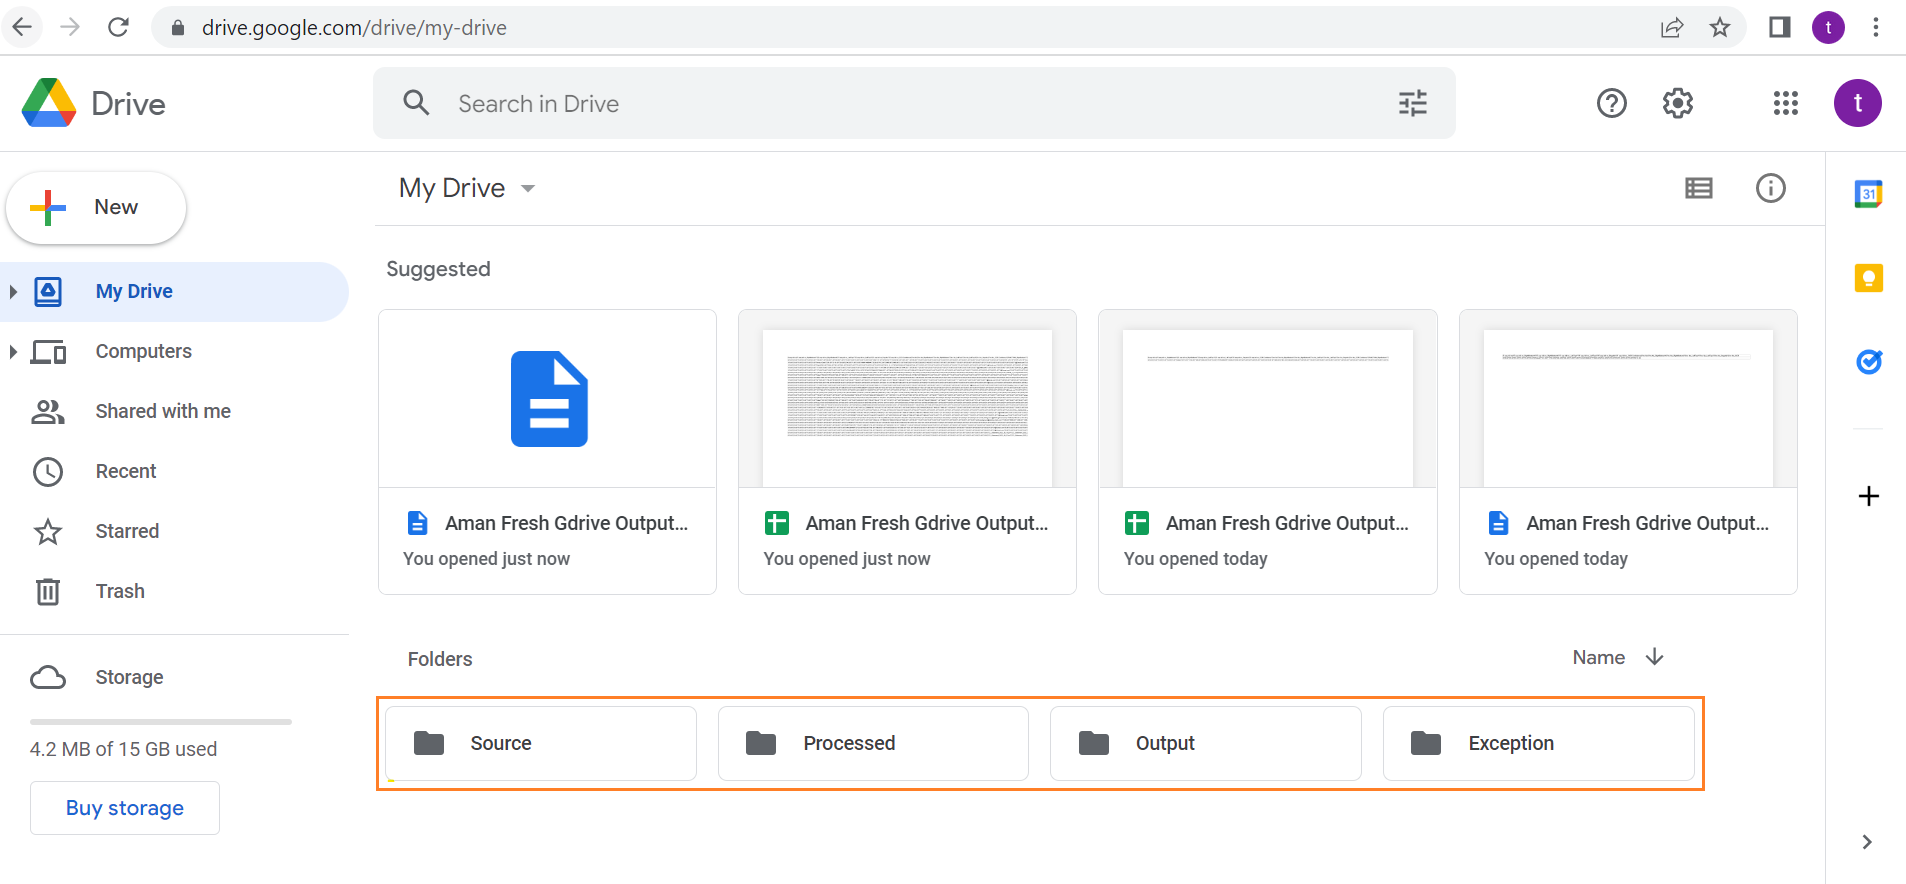
Only Root folder should be created under Google Drive (see below image for example).

-
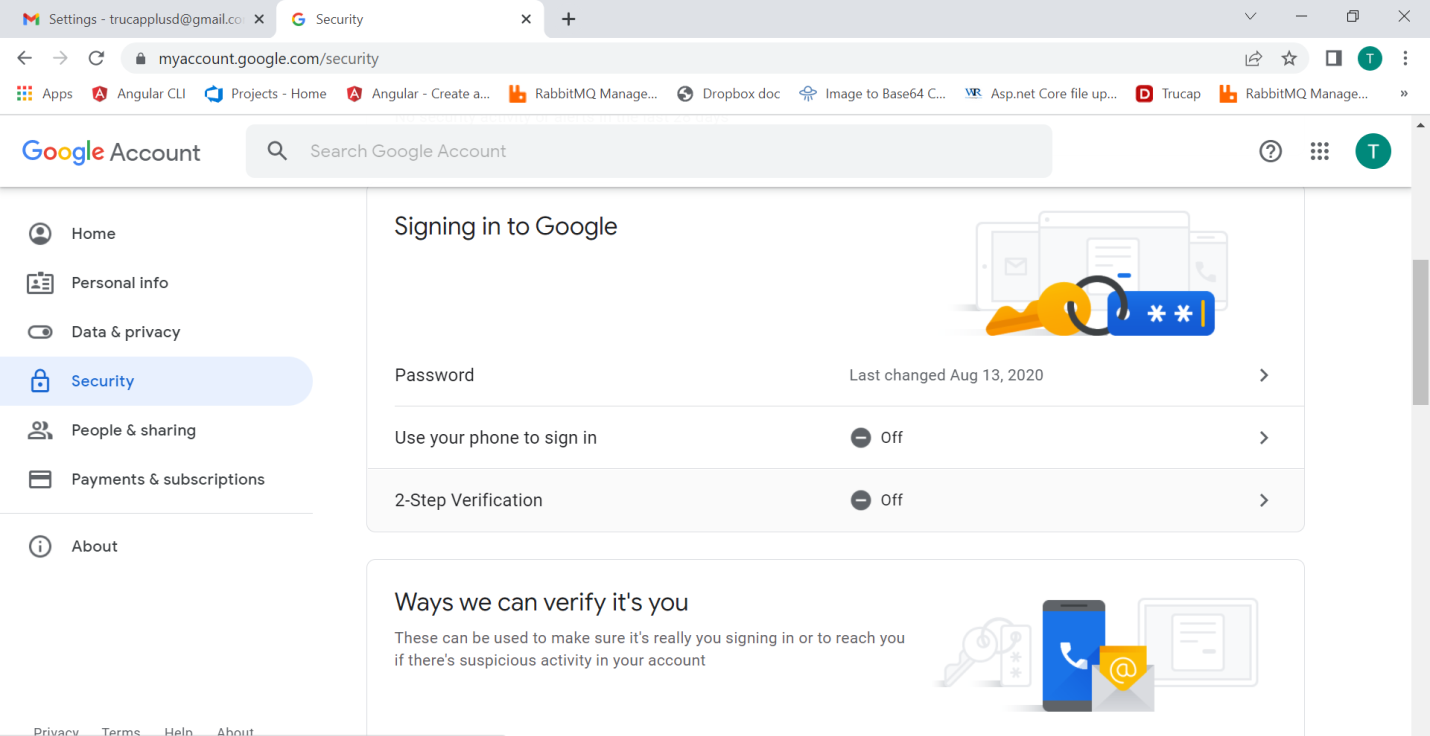
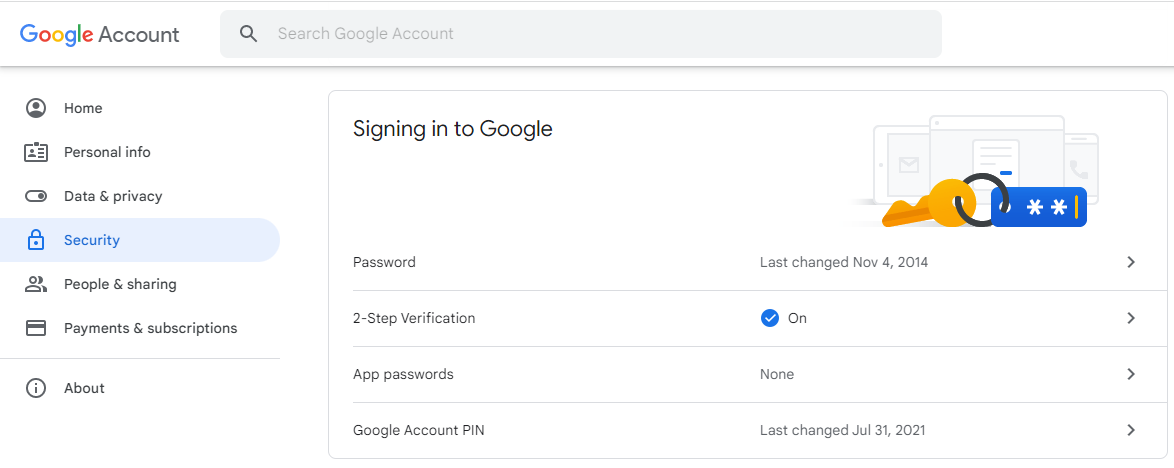
2-step verification must be enabled. To enable 2-step verification, access the google accounts page. On the Google Account page, go to Security and under Signing in to Google, enable 2-Step Verification (see below image).


To configure Google Drive, perform the following steps.
-
Go to google cloud, click Select a Project > New Project.

-
Enter the project name and select the location and click Create. The project is created.

-
Once you create a project, the dashboard for the newly created project is displayed.

-
From the left pane, click APIs & Services > Enabled APIs & services. The APIs & Services screen opens.

-
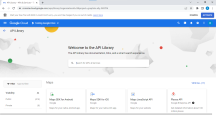
Click on +Enable APIs and Services. The API Library screen opens.
-
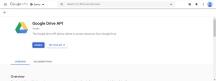
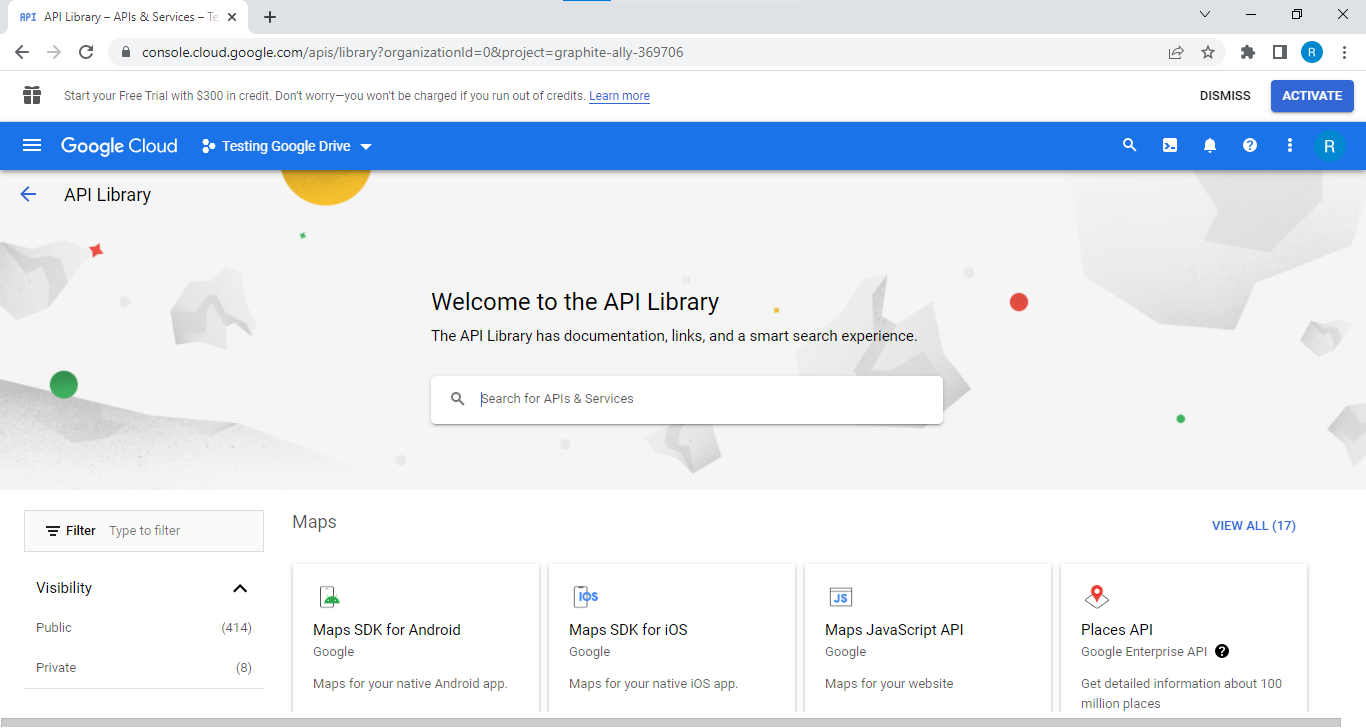
Search for Google Drive API. The Google Drive API screen opens.
-
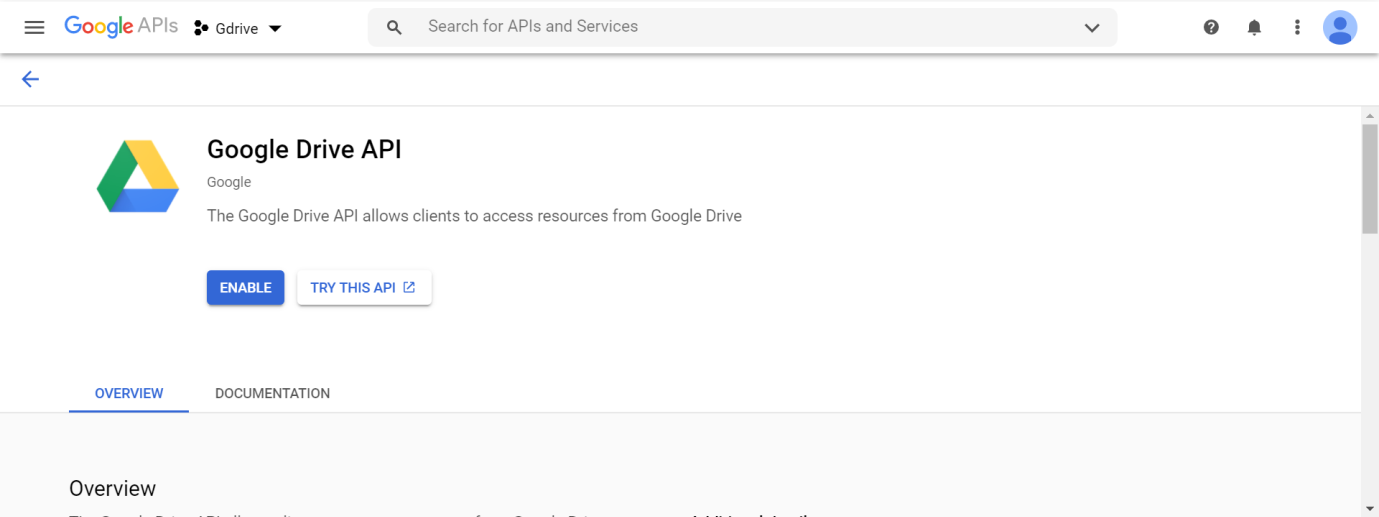
Click Enable to allow clients to access resources from Google drive.
-
Once the Google Drive API is enabled, the API & Services screen opens.

Configuring service account
-
From the left side menu of the API & Services screen, click Credentials > +Create Credentials > Service account.

-
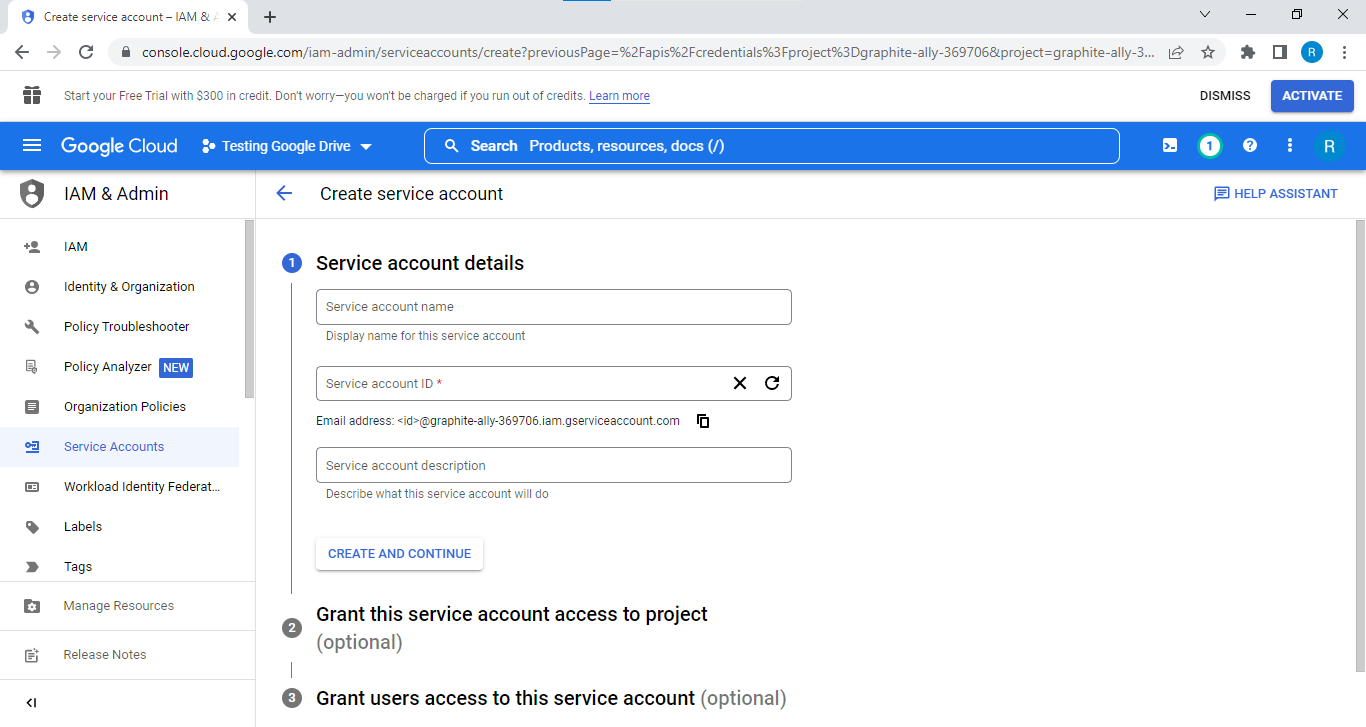
The Create service account screen opens.

-
Enter the details in the Service account details section and click Create and Continue. A service account created message pops up, the Service account details section collapses, and the Grant this service account access to project section expands.

-
Select Owner from the Select a role drop-down list and click Continue. A policy created message pops up, and the Grant this service account access to project section collapses and the Grant users access to this service account section expands along with the Permissions pane is visible on the right-side, which provides the owner-related details (expand to view the details)

-
Enter your current email-id under the Service account users role and Service account admins role text fields respectively and then click Done. The Credentials screen opens.

-
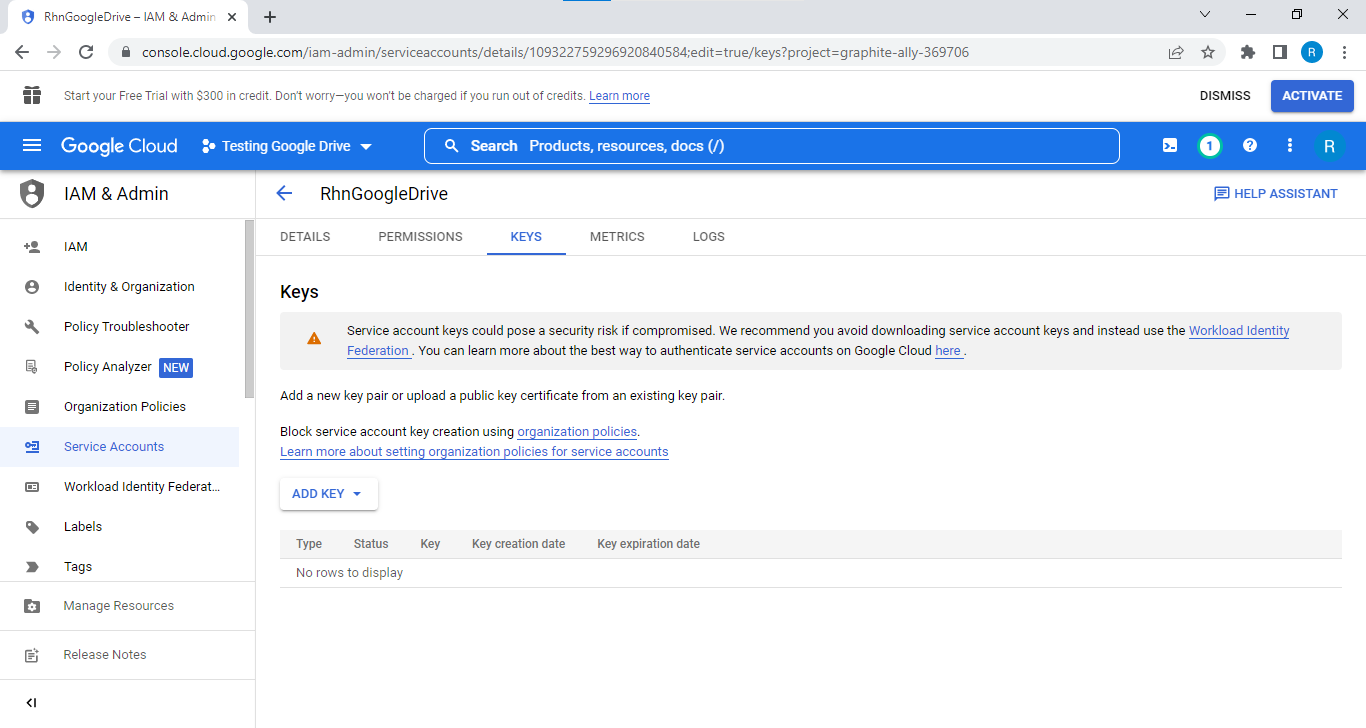
Click on the link visible under the Service Accounts section. The IAM & Admin screen opens. Click on the Keys tab.

-
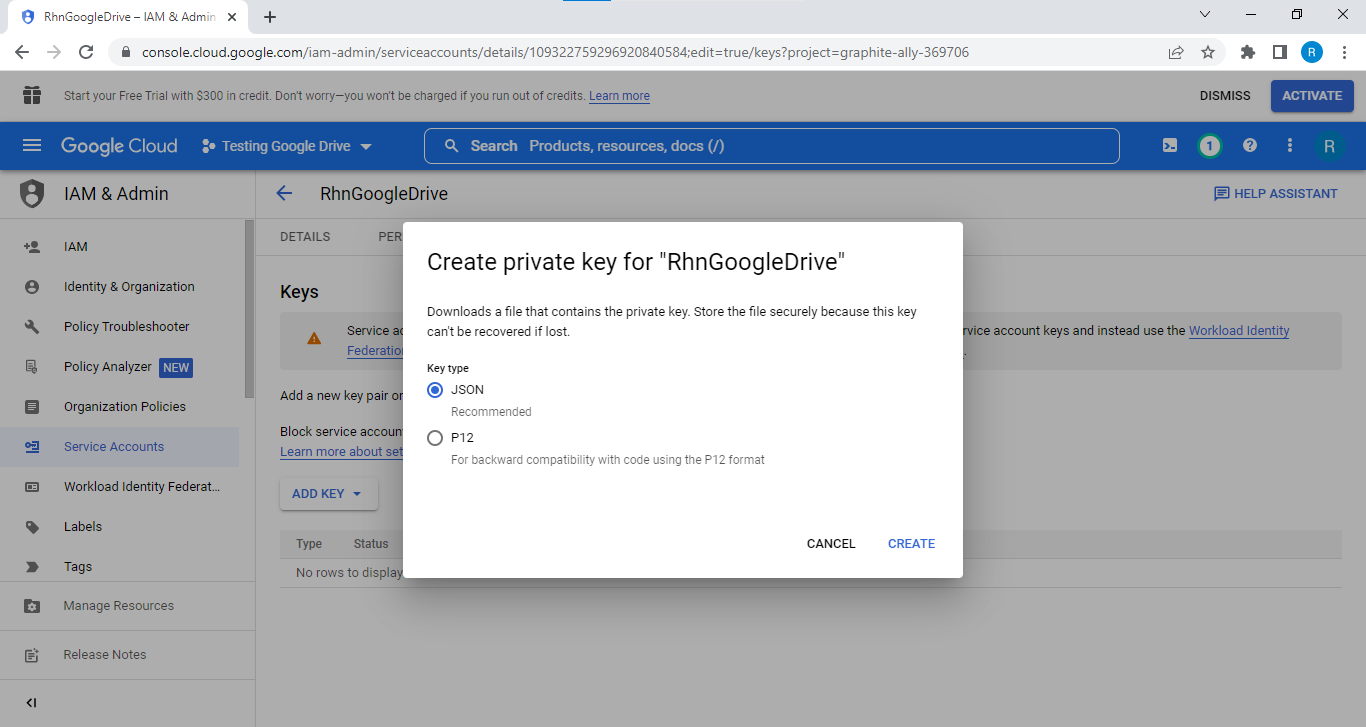
From the Add Key drop-down select Create new key. A Create Private key for the service account screen opens. Click Create.

-
The generated private key saved to your computer message screen appears. Click Close.

-
Go to the Details tab on the IAM & Admin screen and copy the Email id of the service account.

Sharing a Google Drive folder
-
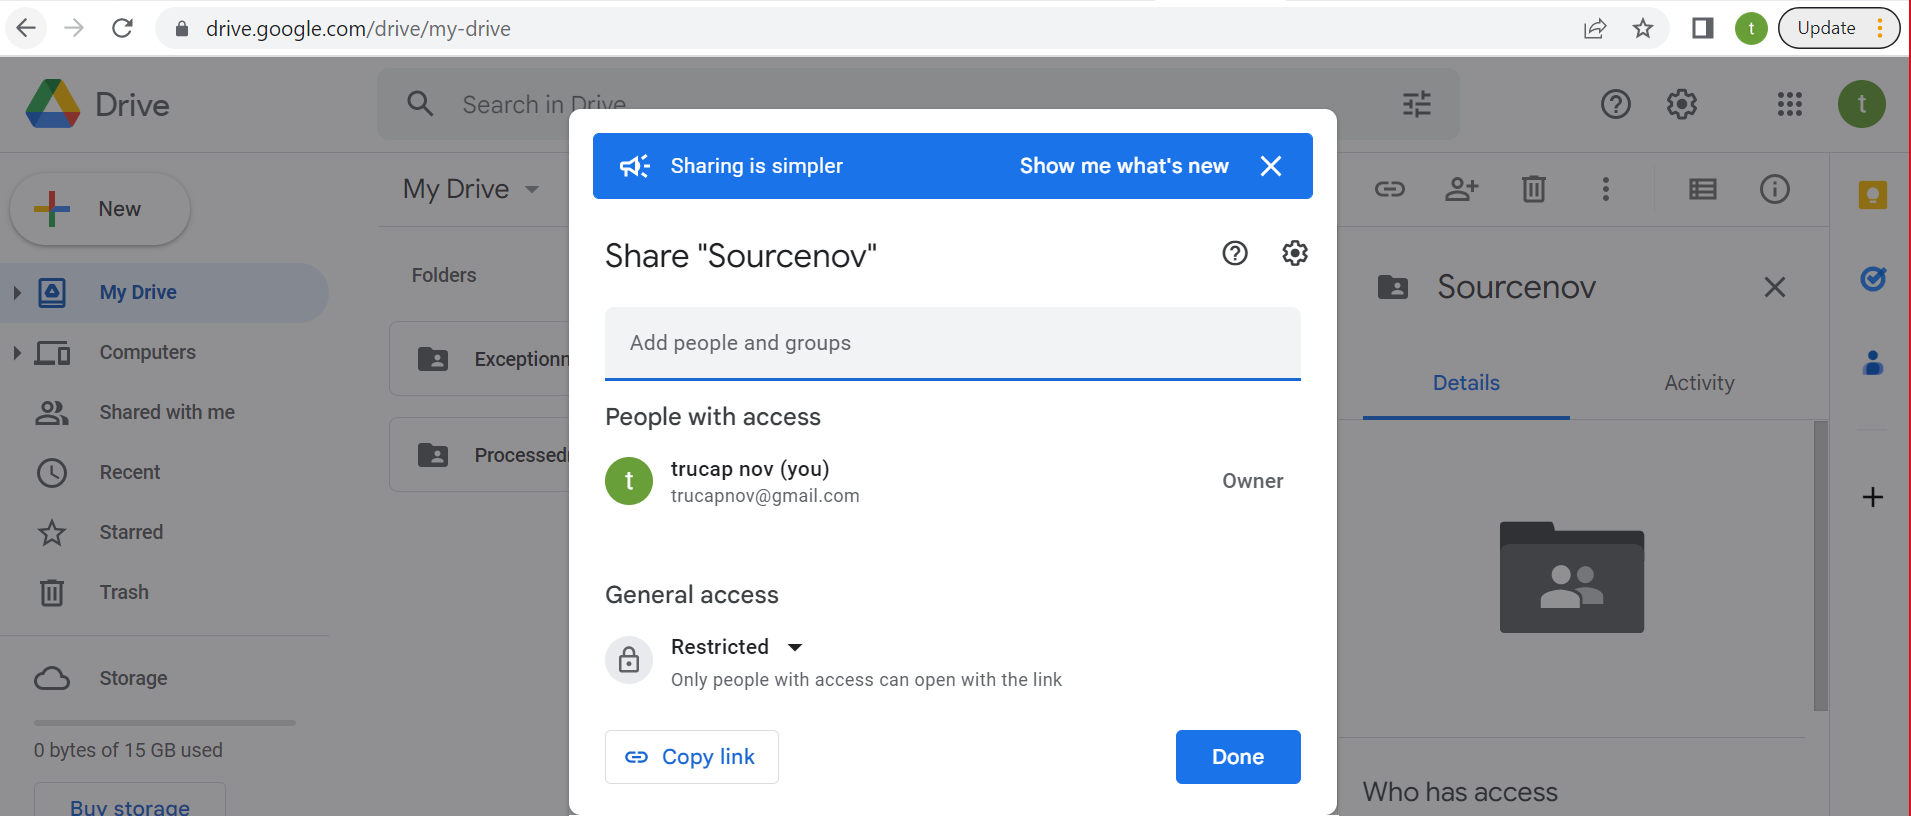
To share a drive folder, Go to Google Drive where you have created the root folders Source, Processed, Output, and Exception (see note). Right-click on the folder and click Share. The Share window opens.

-
Once you paste the email-id, a send notification screen opens, click Send.

-
The drive folder is shared and the copied mail id gets added under People with access section.

-
Now create the Google Drive input source and use the downloaded JSON file in step 16.










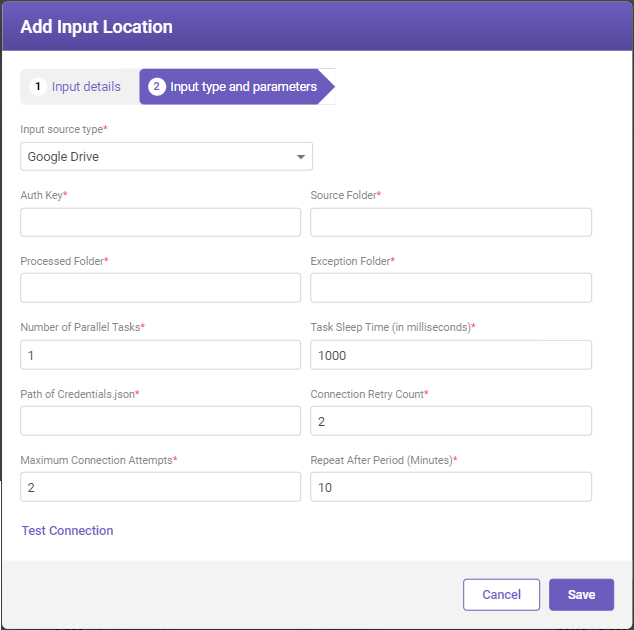
|
FIELD |
DESCRIPTION |
|---|---|
|
Auth Key* |
Enter the authorization key. |
|
Source Folder* |
Enter the input source folder's location path where input files are stored. |
|
Processed Folder* |
Enter the processed folder's location path where processed files will be stored. |
|
Exception Folder* |
Enter the exceptional folder's location path where exceptional files will be stored. |
|
Number of Parallel Tasks* |
Set the number of parallel tasks allowed for downloading files from the input source. Note The default value set is 1; the user can modify it as per requirement. |
|
Task Sleep Time (in milliseconds)* |
Specify the sleep time between successive file downloads. Note The default value set is 1000; the user can modify it as per requirement. The permitted range is between (1000-9999). |
|
Specify the path of the .JSON file containing user credentials to access Google Drive. The file must be kept in a shared folder that is accessible to TruCap+. |
|
|
Connection Retry Count* |
Set the number of connection retry attempts in case of a connection drop. Note The default value set is 2; the user can modify it as per requirement. |
|
Maximum Connection Attempts* |
Specify the maximum connection attempts before the input source stops connecting. Note The default value set is 2; the user can modify it as per requirement. |
|
Repeat After Period (Minutes)* |
Specify the time interval after which connection retry attempts resume. Note The default value set is 10; the user can modify it as per requirement. |
|
Test connection |
Click Test Connection link to test the connection. If the connection fails, ensure network availability and review the entered details. |
|
* Mandatory fields |
|
Email is a widely used method of communication that allows individuals and organizations to exchange messages and files electronically. TruCap+ supports fetching attachments from email messages as input sources, enabling the automation of document processing tasks through email communication.
Configuring Email
Note: Gmail is considered as an example to understand the process of configuring email settings.
To configure Gmail, perform the following steps.
-
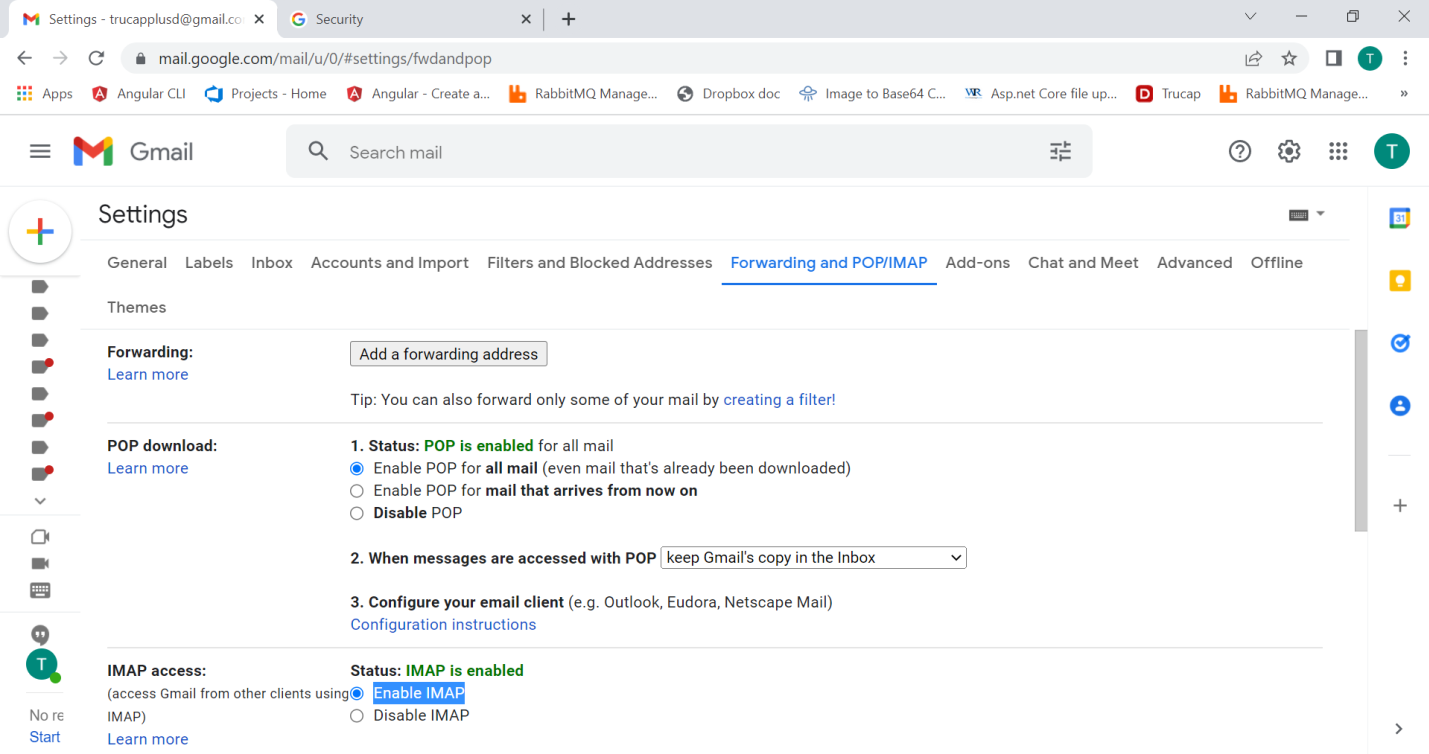
Access the Gmail Settings page and go to the Forwarding and POP/IMAP section. Under POP download, choose Enable POP and under IMAP access, choose Enable IMAP option respectively and click on Save Changes.

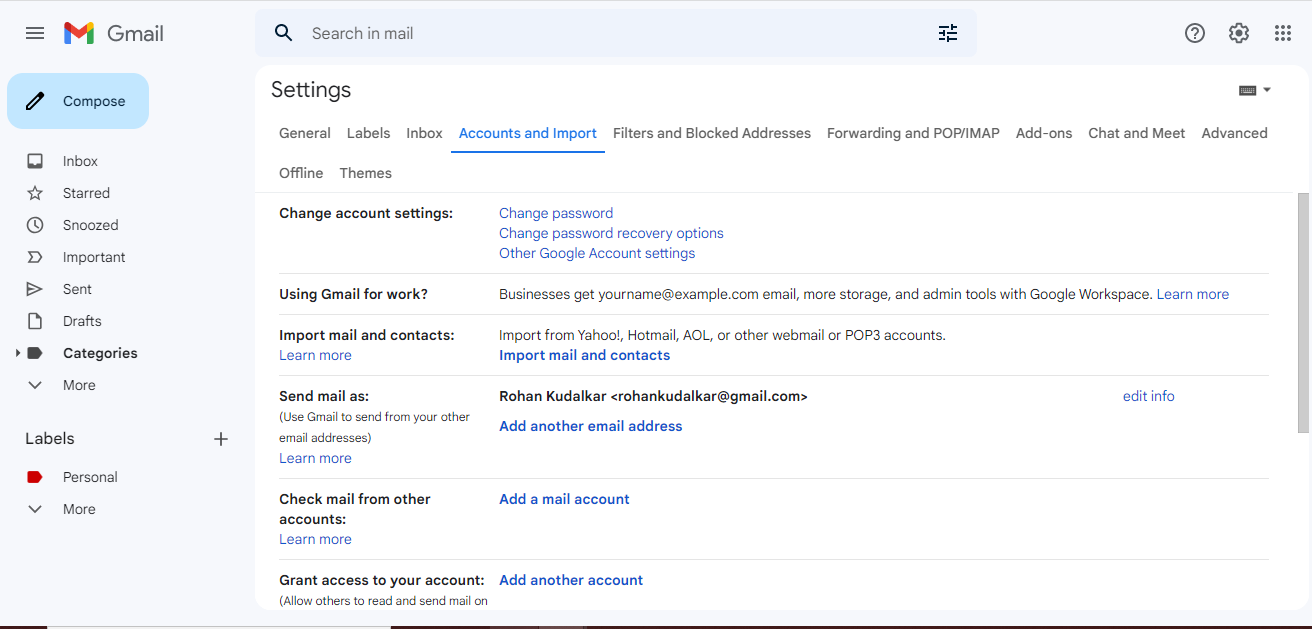
To enable 2-Step verification, you need to access the Google Account page. Perform the following step to access the Google Account page.
-
Go to the Accounts and Import section in the Gmail Settings page, and under Change account settings, click on Other Google Account settings.
Note: You can also access the Google Account page by clicking on Manage your Google Account (available under your Gmail account initial name icon).
-
On the Google Account page, go to Security and under Signing in to Google, enable 2-Step Verification.

-
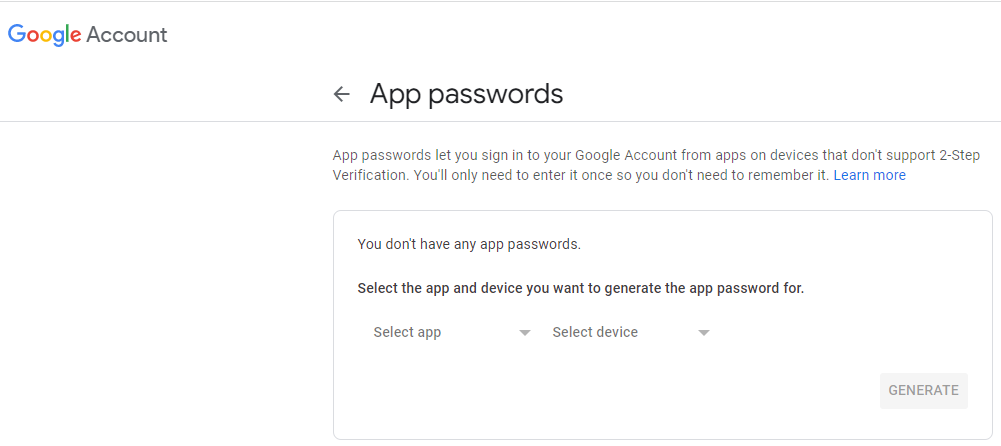
Once you enable 2-Step Verification, the App passwords option is visible as shown in below image.

-
Click on App passwords. The App passwords page opens.

-
From the Select app drop-down list, select the Other (Custom name) option, enter TruCap and click on Generate. A Generated app password window displays the 16-digit code in the yellow box (note this code).
Note:
-
While configuring Gmail as an input source, instead of a Gmail account password, use a 16-digit code as a password.
-
App Passwords can only be used with accounts that have 2-Step Verification enabled.
-
-
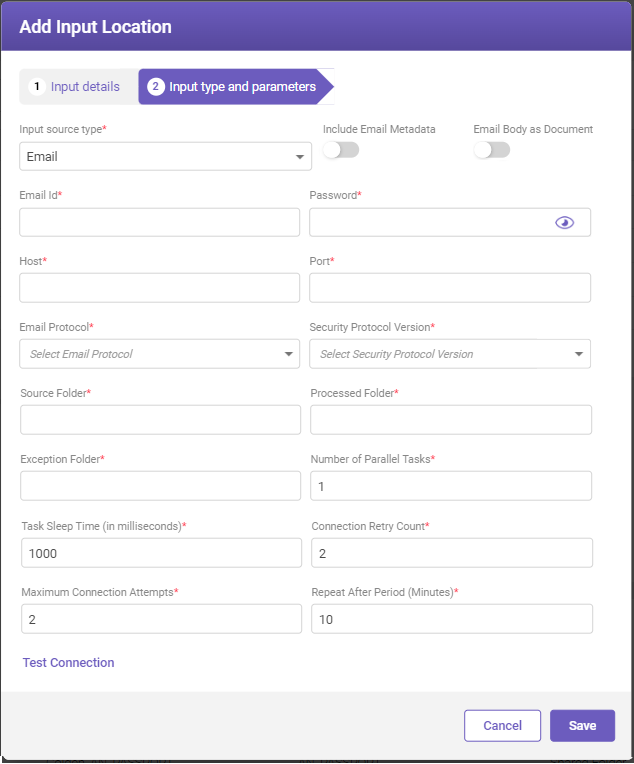
Below settings are required while adding Gmail as input/output source.
FIELD NAME
GMAIL
AS INPUT SOURCE
AS OUTPUT SOURCE
Host imap.gmail.com pop.gmail.com smtp.gmail.com Port 993 995 587 Email Protocol IMAP POP SMTP Security Version SSL TLS TLS
|
FIELD |
DESCRIPTION |
|---|---|
|
Include Email Metadata |
Enabling this toggle button results in the generation of a separate email metadata file in CSV format along with the output file. This email metadata file includes information such as sender name, subject, email body. |
|
Enabling this toggle button treats the email body, which may contain a document, as a separate document to be processed further. Note
|
|
|
Email Id* |
Enter the email ID associated with the source. |
|
Password* |
Enter the password for the provided email ID. |
|
Host* |
Specify the host name for the email server. |
|
Port* |
Specify the port number for the email server. |
|
Email Protocol* |
Select the appropriate email protocol from the drop-down list. |
|
Security Protocol Version* |
Select the appropriate security protocol version from the drop-down list. |
|
Source Folder* |
Enter the input source folder's location path where input files are stored. |
|
Processed Folder* |
Enter the processed folder's location path where processed files will be stored. |
|
Exception Folder* |
Enter the exceptional folder's location path where exceptional files will be stored. |
|
Number of Parallel Tasks* |
Set the number of parallel tasks allowed for downloading files from the input source. Note The default value set is 1; the user can modify it as per requirement. |
|
Task Sleep Time (in milliseconds)* |
Specify the sleep time between successive file downloads. Note The default value set is 1000; the user can modify it as per requirement. The permitted range is between (1000-9999). |
|
Connection Retry Count* |
Set the number of connection retry attempts in case of a connection drop. Note The default value set is 2; the user can modify it as per requirement. |
|
Maximum Connection Attempts* |
Specify the maximum connection attempts before the input source stops connecting. Note The default value set is 2; the user can modify it as per requirement. |
|
Repeat After Period (Minutes)* |
Specify the time interval after which connection retry attempts resume. Note The default value set is 10; the user can modify it as per requirement. |
|
Test connection
|
Click Test Connection link to test the connection. If the connection fails, ensure network availability and review the entered details. |
|
* Mandatory fields |
|
DropBox is a file hosting service that allows users to store and share files in the cloud. It provides synchronization across devices and easy sharing options. With TruCap+, you can integrate DropBox as an input source to retrieve files for processing.
Configuring Dropbox
To configure Dropbox, perform the following steps.
-
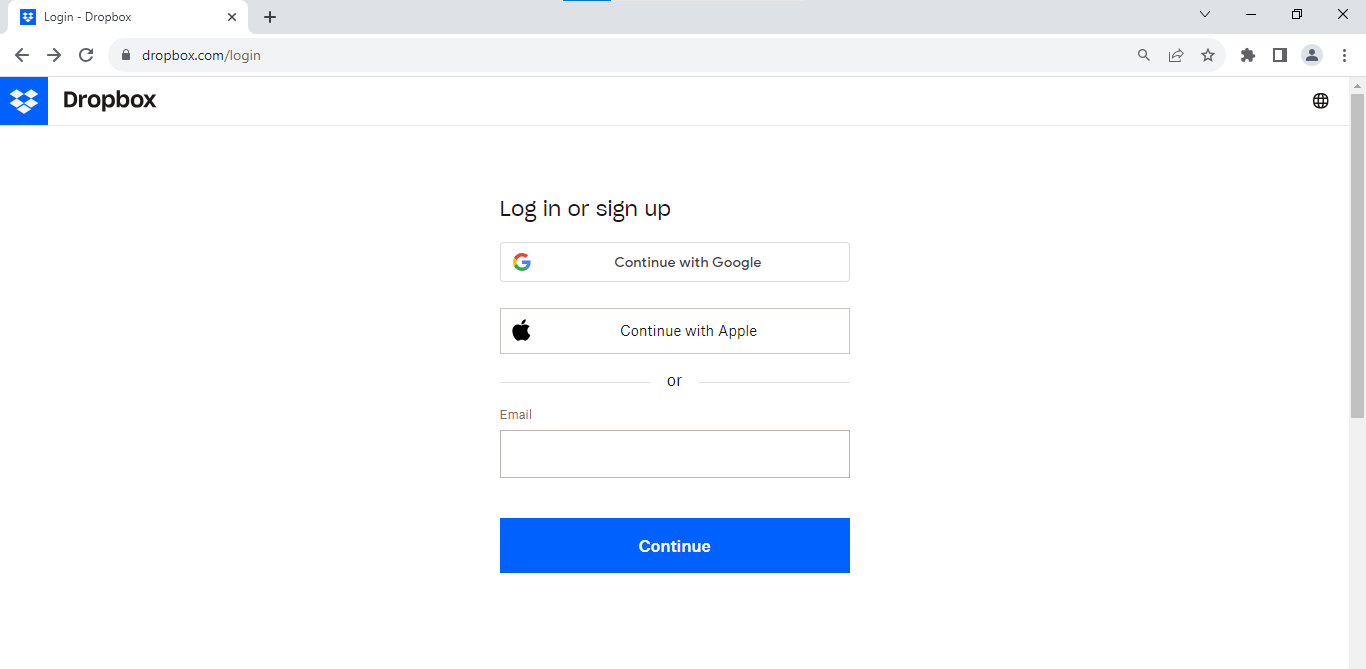
Go to Dropbox, and create an account if you don't have an account or else you can continue with the Google account.

-
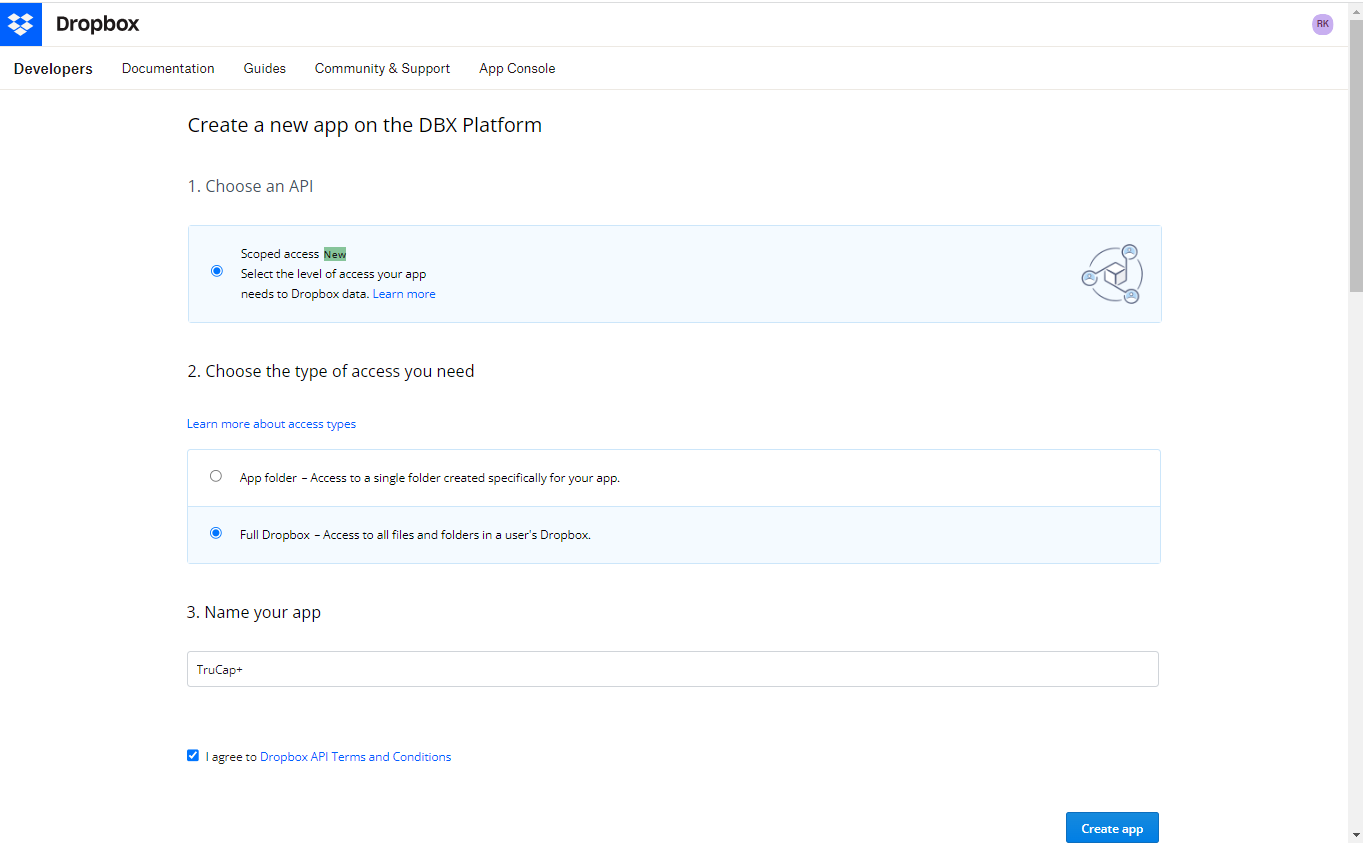
Once you have created an Dropbox account. Go to app creation page to create an app. The Create a new app on the DBX Platform page opens.
-
Under Choose an API section, select Scoped access New.
-
Under Choose the type of access you need section, select Full Dropbox– Access to all files and folders in a user's Dropbox option.
-
Under Name your app section, enter a name for the app and click Create app.
-
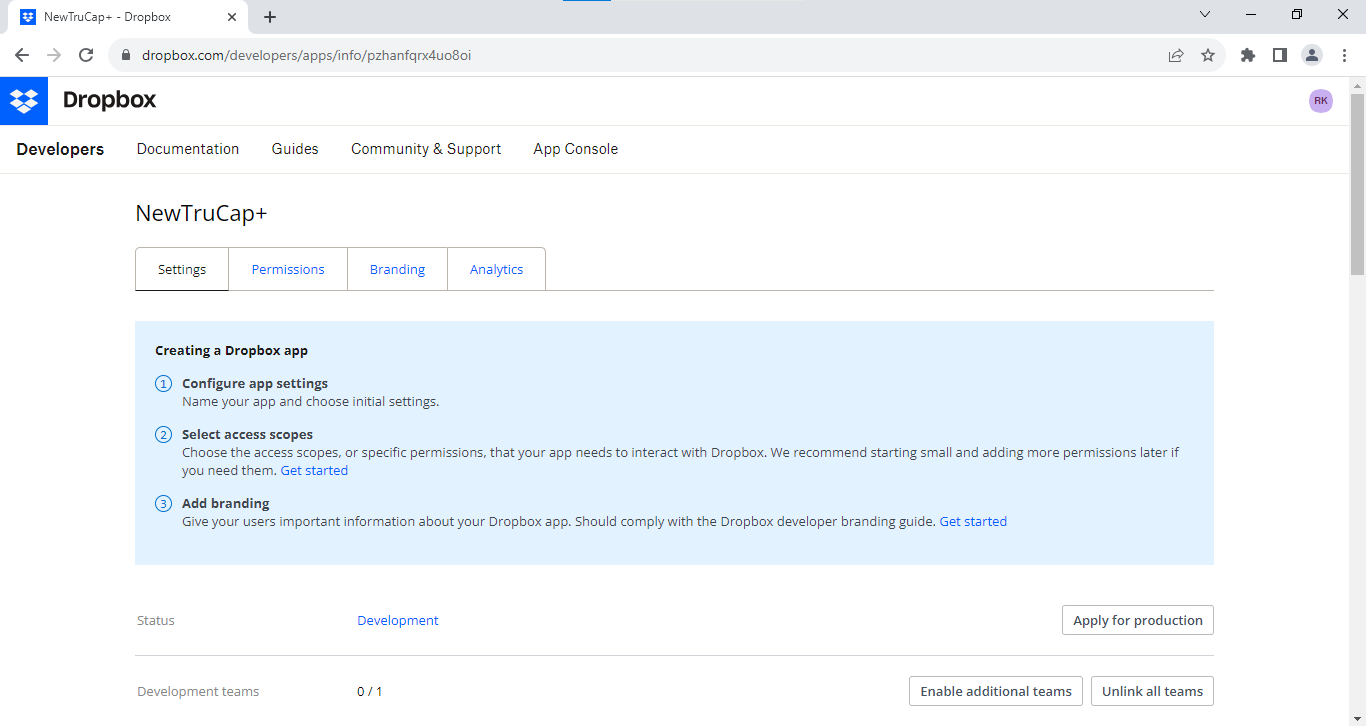
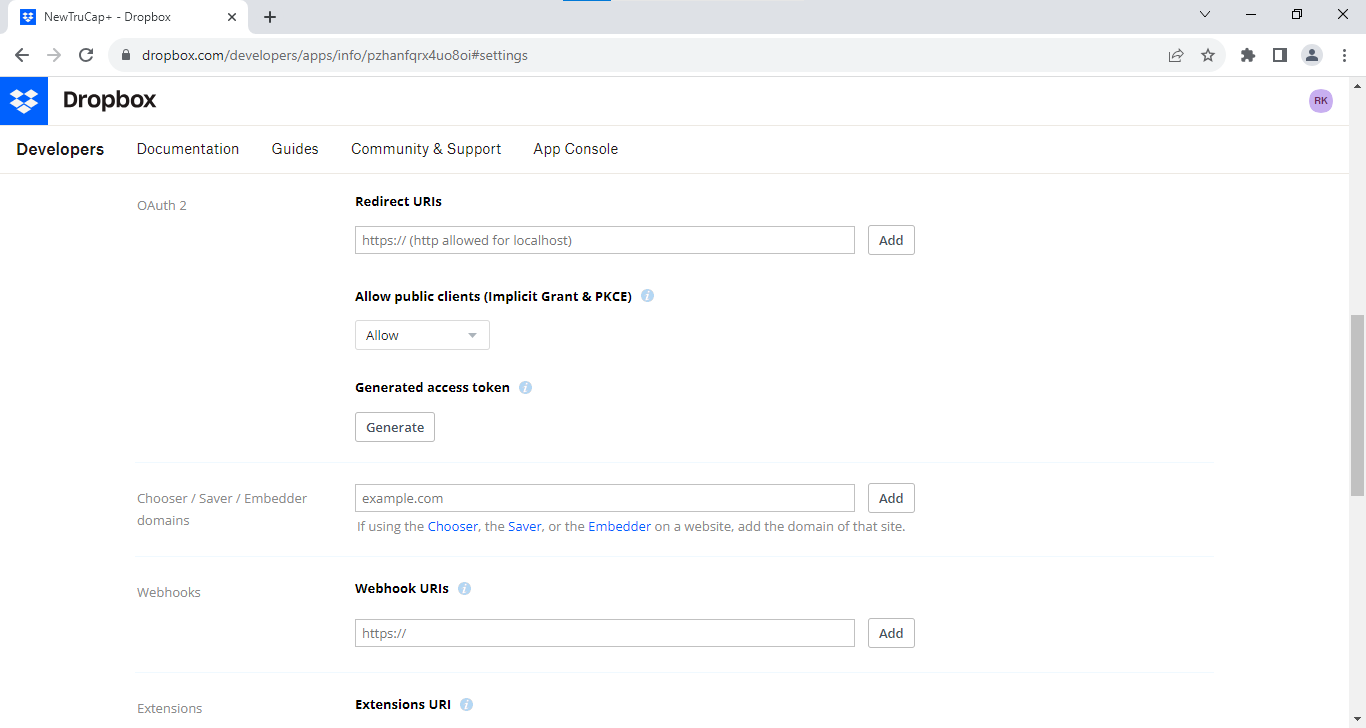
Once you create an app, the page with the app name with 4 tabs opens (see the below image). On this page you can configure app settings, select access scopes, and add branding.

-
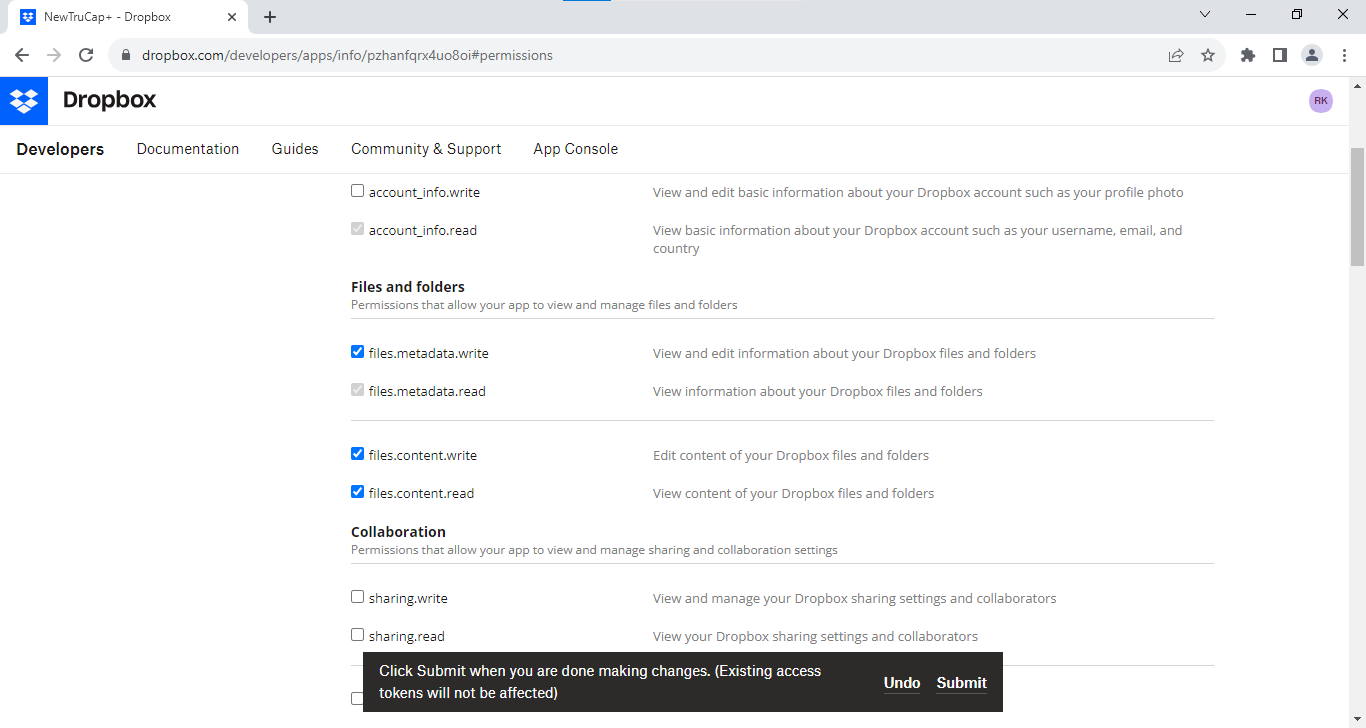
Go to Permissions tab, and under Files and Folders section, select all the options and click Submit. Once you click Submit, Permissions change successful message is displayed.

-
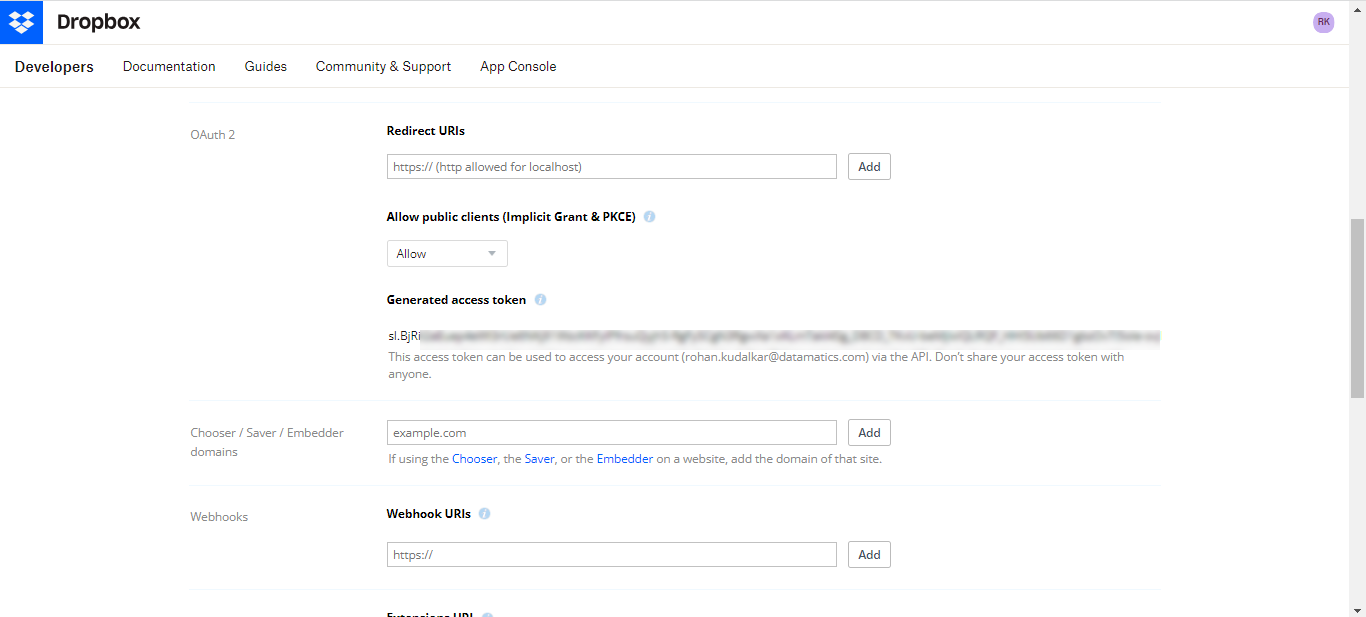
Go to Settings tab, and under Generated access token field, click Generate button.

-
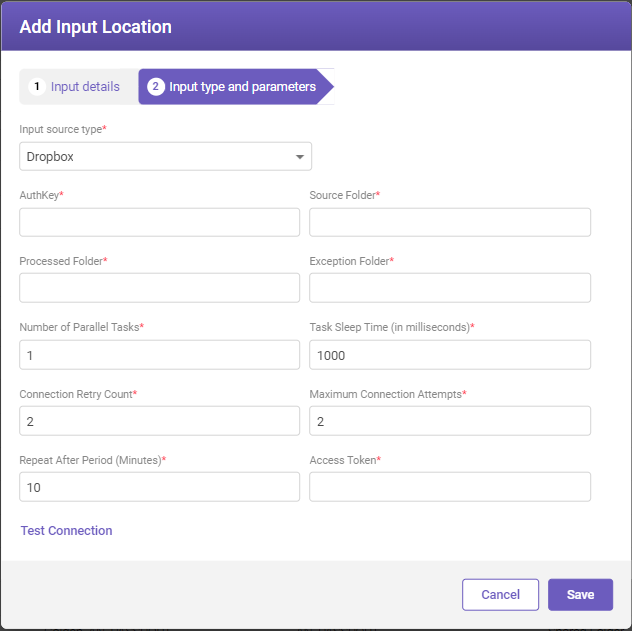
Copy the generated access token and paste it in Access Token field while creating the input source.

-
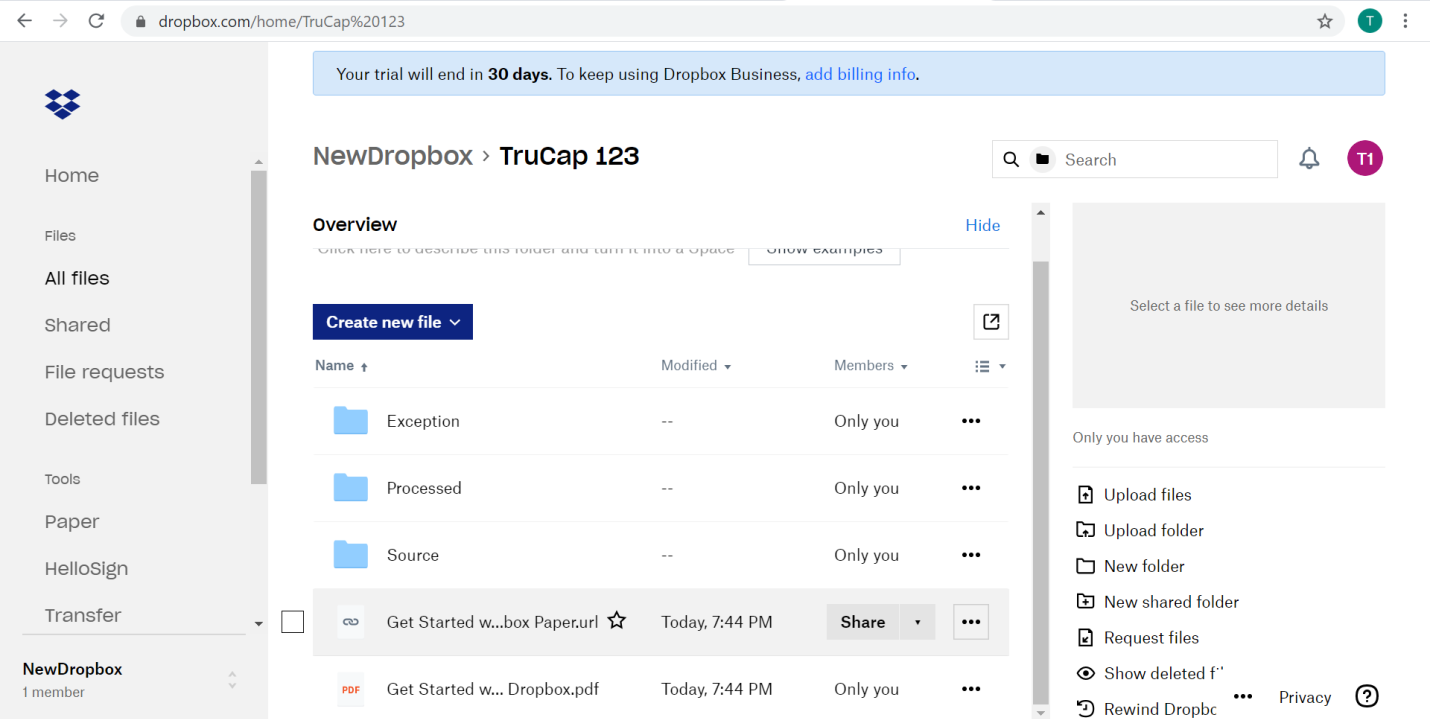
Go to Dropbox home page and create source, processed, and exception folders and enter the individual folder location paths in the respective fields while setting Dropbox as input source.

|
FIELD |
DESCRIPTION |
|---|---|
|
Auth Key* |
Enter the App key (see the image below), which can be found under the Settings tab while configuring Dropbox.
|
|
Source Folder* |
Enter the input source folder's location path where input files are stored. |
|
Processed Folder* |
Enter the processed folder's location path where processed files will be stored. |
|
Exception Folder* |
Enter the exceptional folder's location path where exceptional files will be stored. |
|
Number of Parallel Tasks* |
Set the number of parallel tasks allowed for downloading files from the input source. Note The default value set is 1; the user can modify it as per requirement. |
|
Task Sleep Time (in milliseconds)* |
Specify the sleep time between successive file downloads. Note The default value set is 1000; the user can modify it as per requirement. The permitted range is between (1000-9999). |
|
Connection Retry Count* |
Set the number of connection retry attempts in case of a connection drop. Note The default value set is 2; the user can modify it as per requirement. |
|
Maximum Connection Attempts* |
Specify the maximum connection attempts before the input source stops connecting. Note The default value set is 2; the user can modify it as per requirement. |
|
Repeat After Period (Minutes)* |
Specify the time interval after which connection retry attempts resume. Note The default value set is 10; the user can modify it as per requirement. |
|
Specify the access token generated while configuring Dropbox. |
|
|
Test connection
|
Click Test Connection link to test the connection. If the connection fails, ensure network availability and review the entered details. |
|
* Mandatory fields |
|

FTP is a standard network protocol for transferring files between a client and a server on a computer network. TruCap+ supports FTP as an input source, allowing you to download files from FTP servers for processing.
Note:
In a Multi-tenant DOCKER environment, we do not support SFTP. To execute the SFTP source, an input service must be deployed on virtual machine. Refer Installing TruCap+ services for more information.
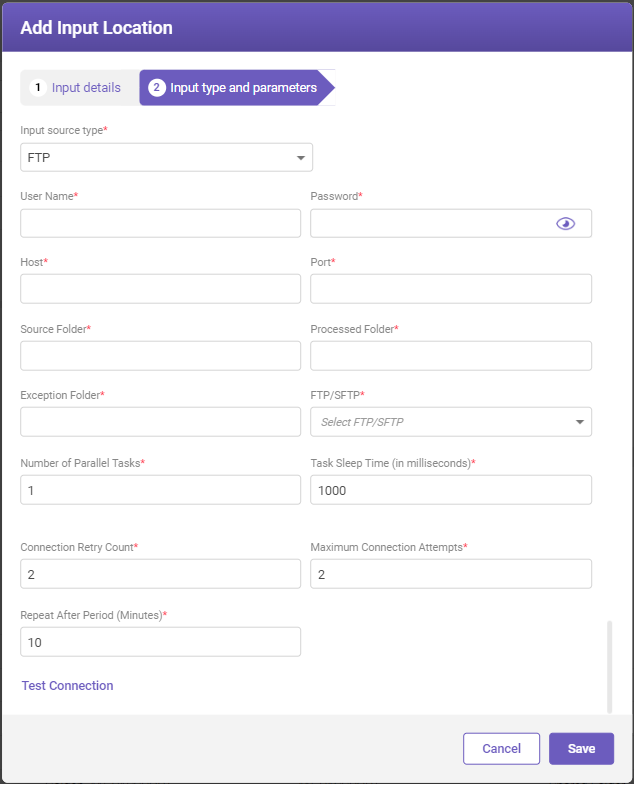
|
FIELD |
DESCRIPTION |
|---|---|
|
User Name* |
Enter the username associated with the FTP server. |
|
Password* |
Enter the password for the provided username. |
|
Specify the host name of the FTP server. |
|
|
Specify the port number for the FTP server. |
|
|
Source Folder* |
Enter the input source folder's location path where input files are stored. |
|
Processed Folder* |
Enter the processed folder's location path where processed files will be stored. |
|
Exception Folder* |
Enter the exceptional folder's location path where exceptional files will be stored. |
|
Select the appropriate option (FTP or SFTP) from the drop-down list to determine the type of connection. |
|
|
Number of Parallel Tasks* |
Set the number of parallel tasks allowed for downloading files from the input source. Note The default value set is 1; the user can modify it as per requirement. |
|
Task Sleep Time (in milliseconds)* |
Specify the sleep time between successive file downloads. Note The default value set is 1000; the user can modify it as per requirement. The permitted range is between (1000-9999). |
|
Enable the toggle switch if you want to add an extra layer of security by using the SSH host key for SFTP connections. Note This toggle switch is visible when you select SFTP from the FTP/SFTP drop-down list. |
|
|
This parameter is required for SFTP connections. It involves presenting an optional key called SSH Host Key Finger Print to the server for added security. Obtain this key from the SFTP server and configure it in this parameter. Note This field is visible when you enable the SSH Host Key Finger Print Required ? toggle switch. |
|
|
Connection Retry Count* |
Set the number of connection retry attempts in case of a connection drop. Note The default value set is 2; the user can modify it as per requirement. |
|
Maximum Connection Attempts* |
Specify the maximum connection attempts before the input source stops connecting. Note The default value set is 2; the user can modify it as per requirement. |
|
Repeat After Period (Minutes)* |
Specify the time interval after which connection retry attempts resume. Note The default value set is 10; the user can modify it as per requirement. |
|
Test connection
|
Click Test Connection link to test the connection. If the connection fails, ensure network availability and review the entered details. |
|
* Mandatory fields |
|
A shared folder is a directory accessible by multiple users on a network. TruCap+ enables you to use shared folders as input sources, fetching files stored in these folders and processing them.
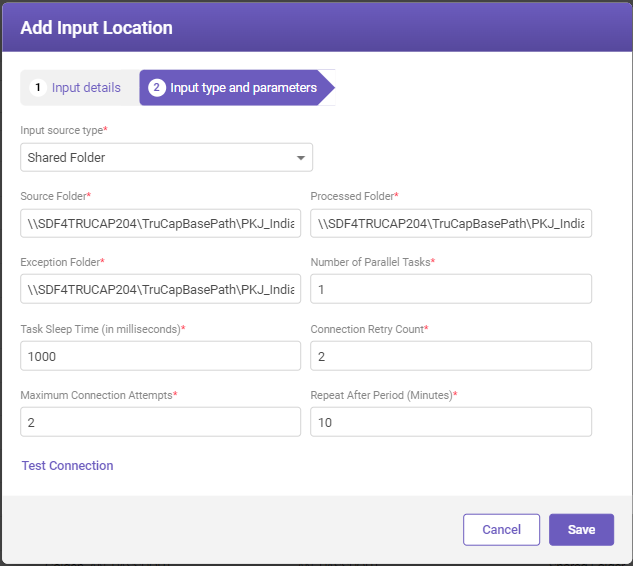
|
FIELD |
DESCRIPTION |
|---|---|
|
Source Folder* |
Auto-populates the input source folder's location path where processed files will be stored. |
|
Processed Folder* |
Auto-populates the processed folder's location path where processed files will be stored. |
|
Exception Folder* |
Auto-populates the exceptional folder's location path where processed files will be stored. |
|
Number of Parallel Tasks* |
Set the number of parallel tasks allowed for downloading files from the input source. Note The default value set is 1; the user can modify it as per requirement. |
|
Task Sleep Time (in milliseconds)* |
Specify the sleep time between successive file downloads. Note The default value set is 1000; the user can modify it as per requirement. The permitted range is between (1000-9999). |
|
Connection Retry Count* |
Set the number of connection retry attempts in case of a connection drop. Note The default value set is 2; the user can modify it as per requirement. |
|
Maximum Connection Attempts* |
Specify the maximum connection attempts before the input source stops connecting. Note The default value set is 2; the user can modify it as per requirement. |
|
Repeat After Period (Minutes)* |
Specify the time interval after which connection retry attempts resume. Note The default value set is 10; the user can modify it as per requirement. |
|
Test connection
|
Click Test Connection link to test the connection. If the connection fails, ensure network availability and review the entered details. |
|
* Mandatory fields |
|
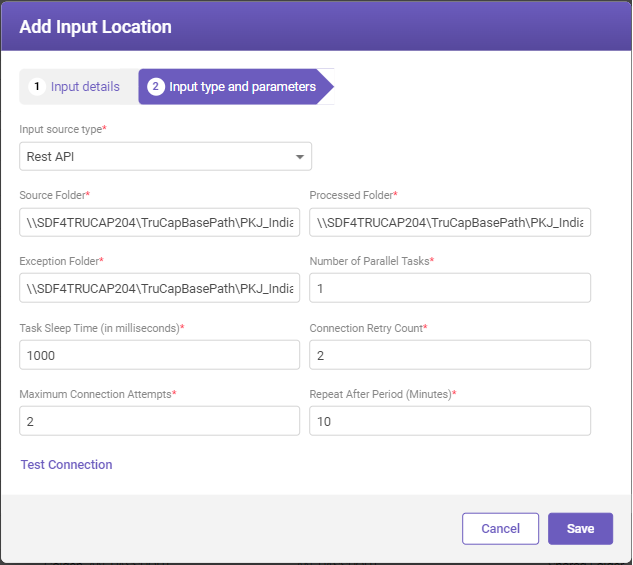
A Rest API is a set of rules and protocols allowing different software applications to communicate over the internet. TruCap+ can interact with Rest APIs to fetch data and files from external systems for processing.
Note:
In Client Rest API the request is sent to the client API to fetch the source location as compared to Rest API where the request is sent to the input source location.
Configuring Rest API
To configure Rest API, perform the following steps.
-
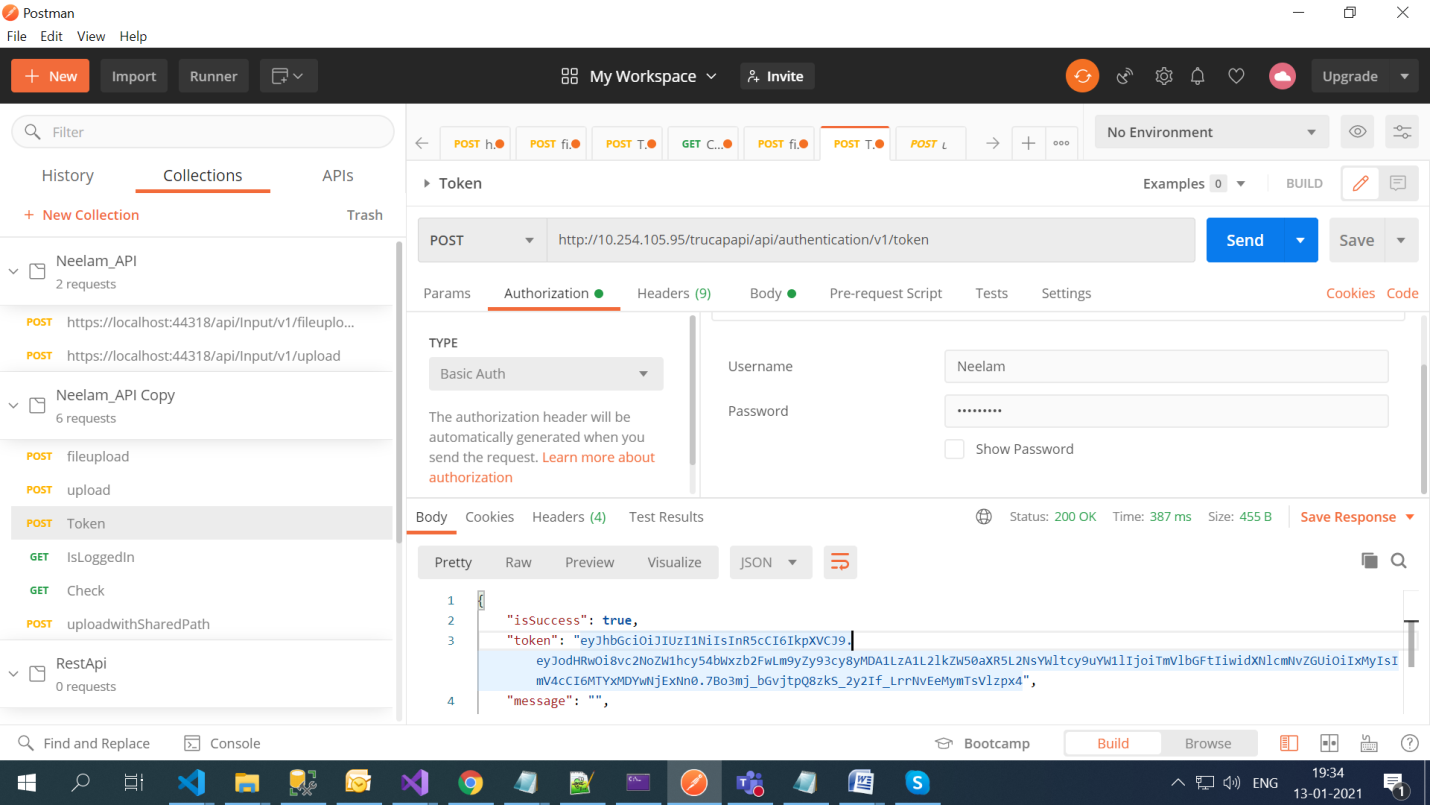
Create a token using the URL and under the Authorization tab, select Basic Auth, provide credentials, and then click Send. It will return a token.
-
Use the given URL to upload multiple files (Select single file /zip files(for multiple files)). Under the Authorization tab, select Bearer Token and paste token, which is returned from step 1.
-
Under the Body tab, pass parameters (select files, pass JSON in file details which include document type, document subtype, and label which is used as batch name) and then click Send.
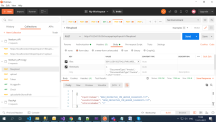
-
For a single file to be uploaded from the shared path or using a base 64 string, use the given URL. Under the Authorization tab, select Bearer Token and paste token, which is returned from step 1.
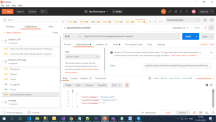
-
Under the Body tab, pass parameters (shared path to be passed in file path Base 64 string of image to be passed in file content) and then click Send.
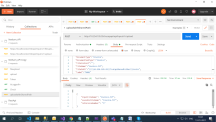
Any one of the above two can be used to upload a file.
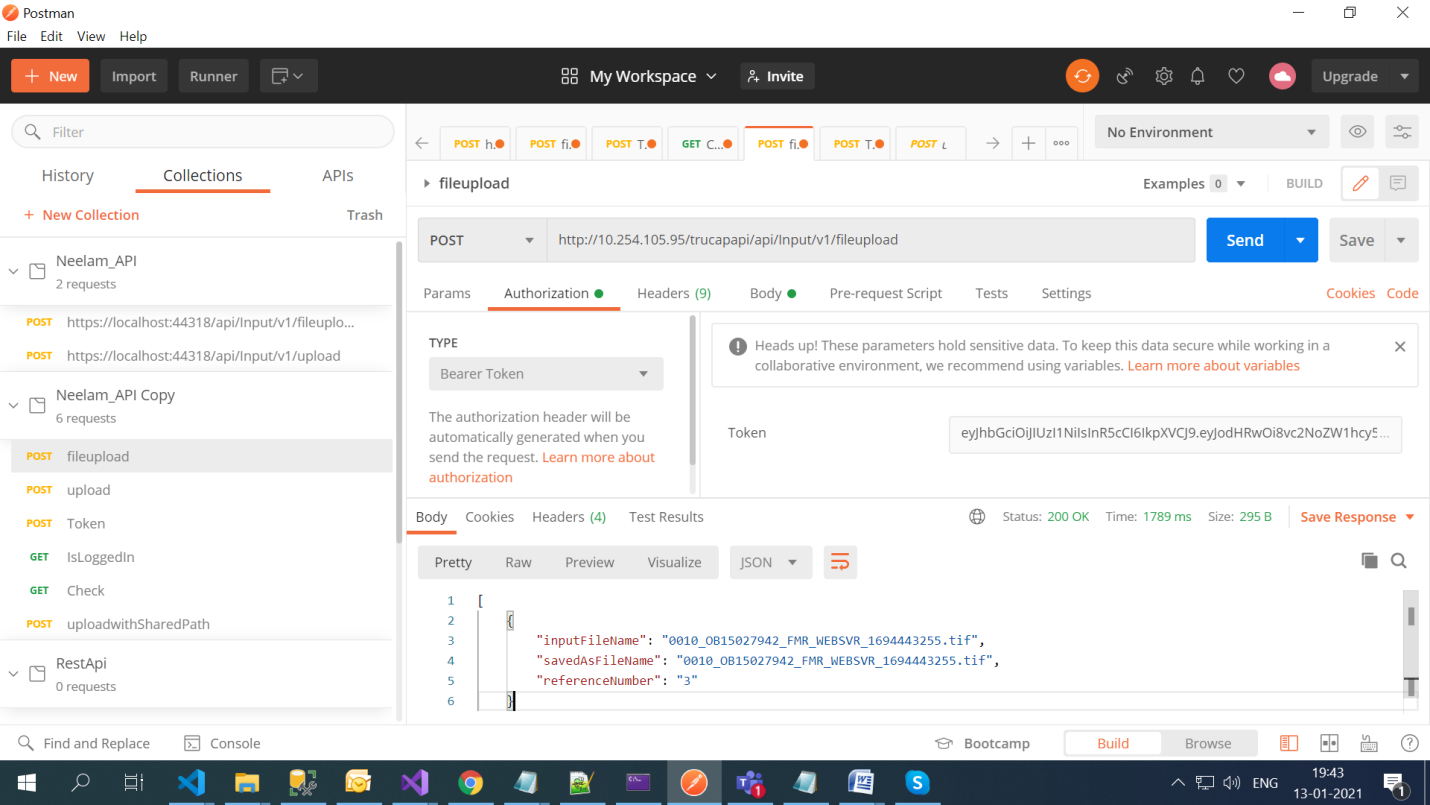
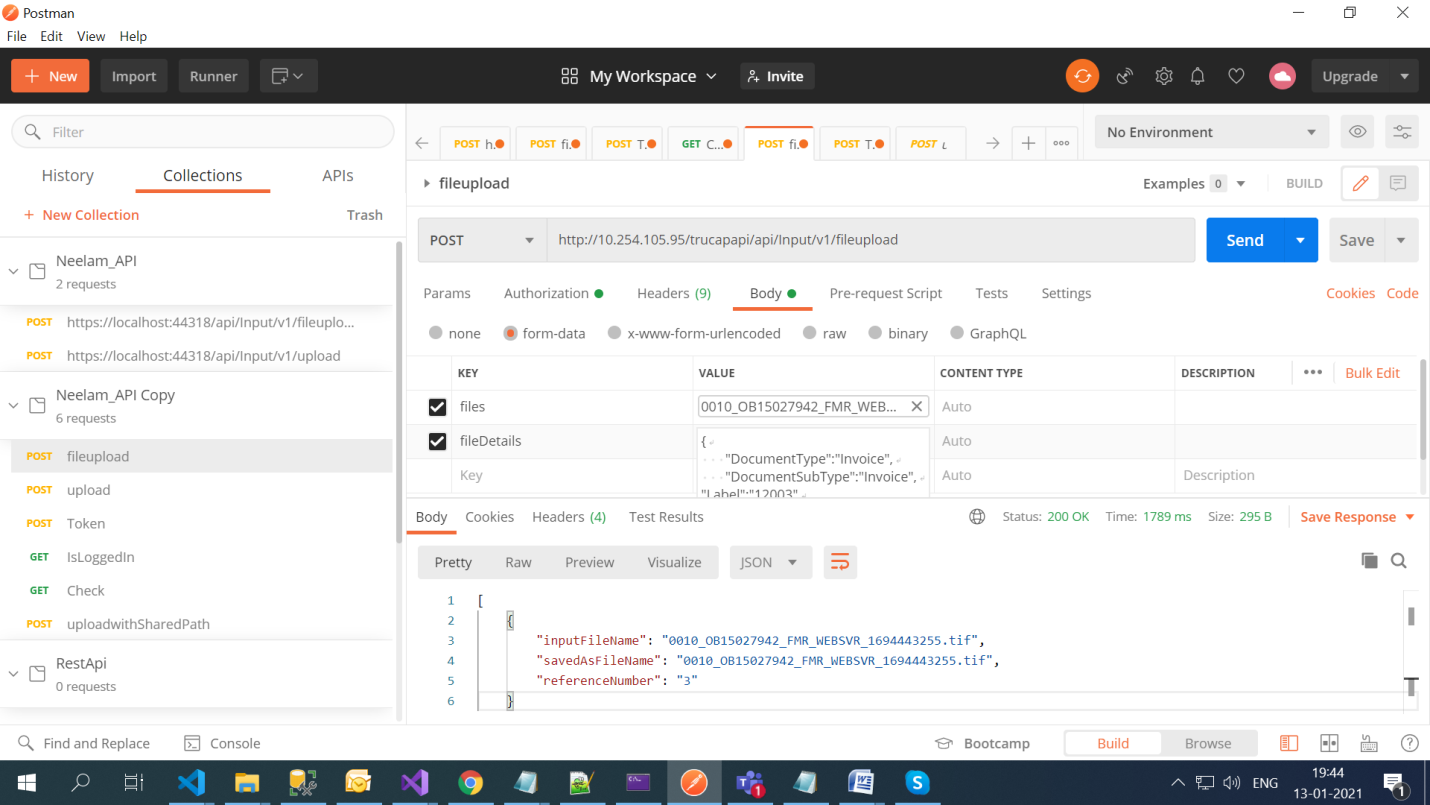
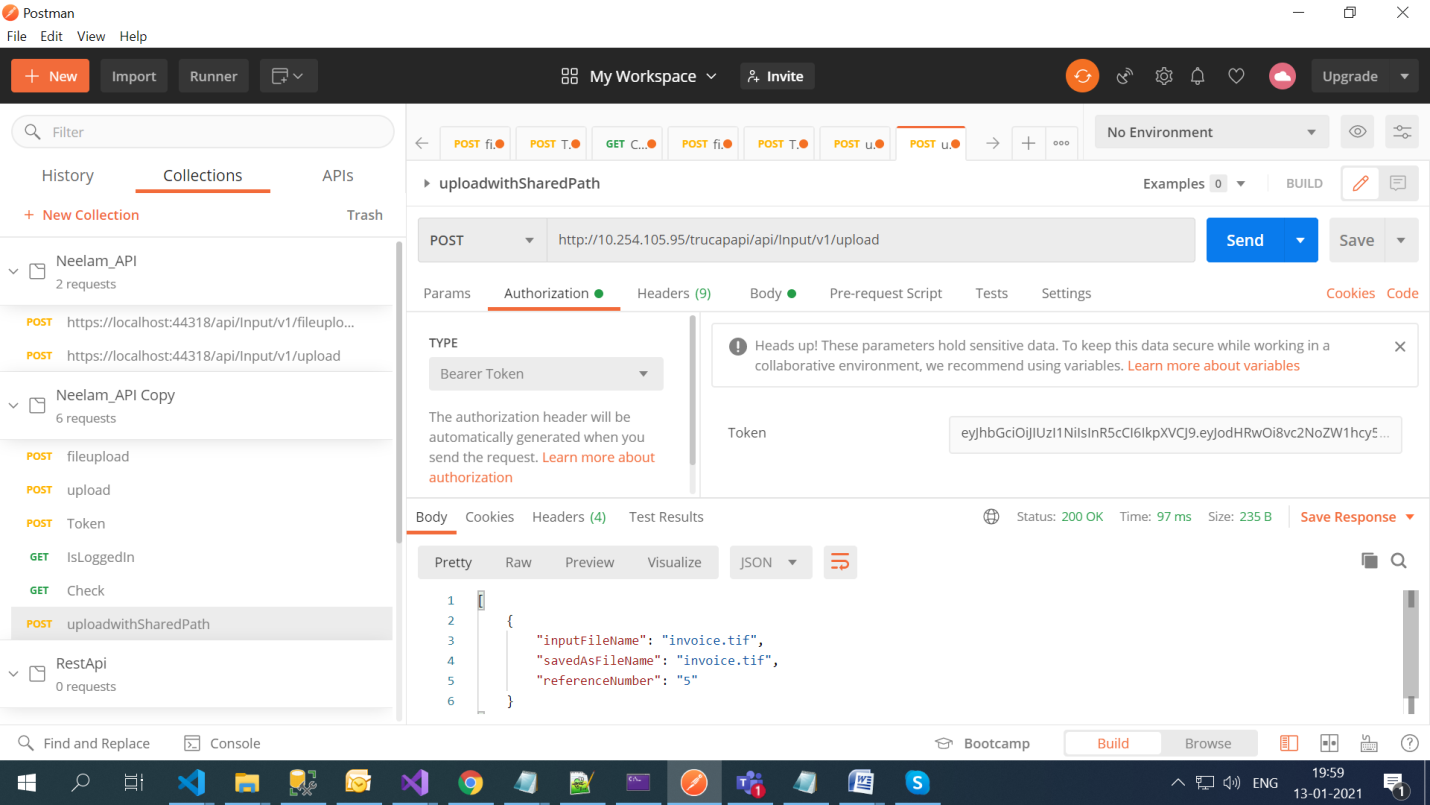
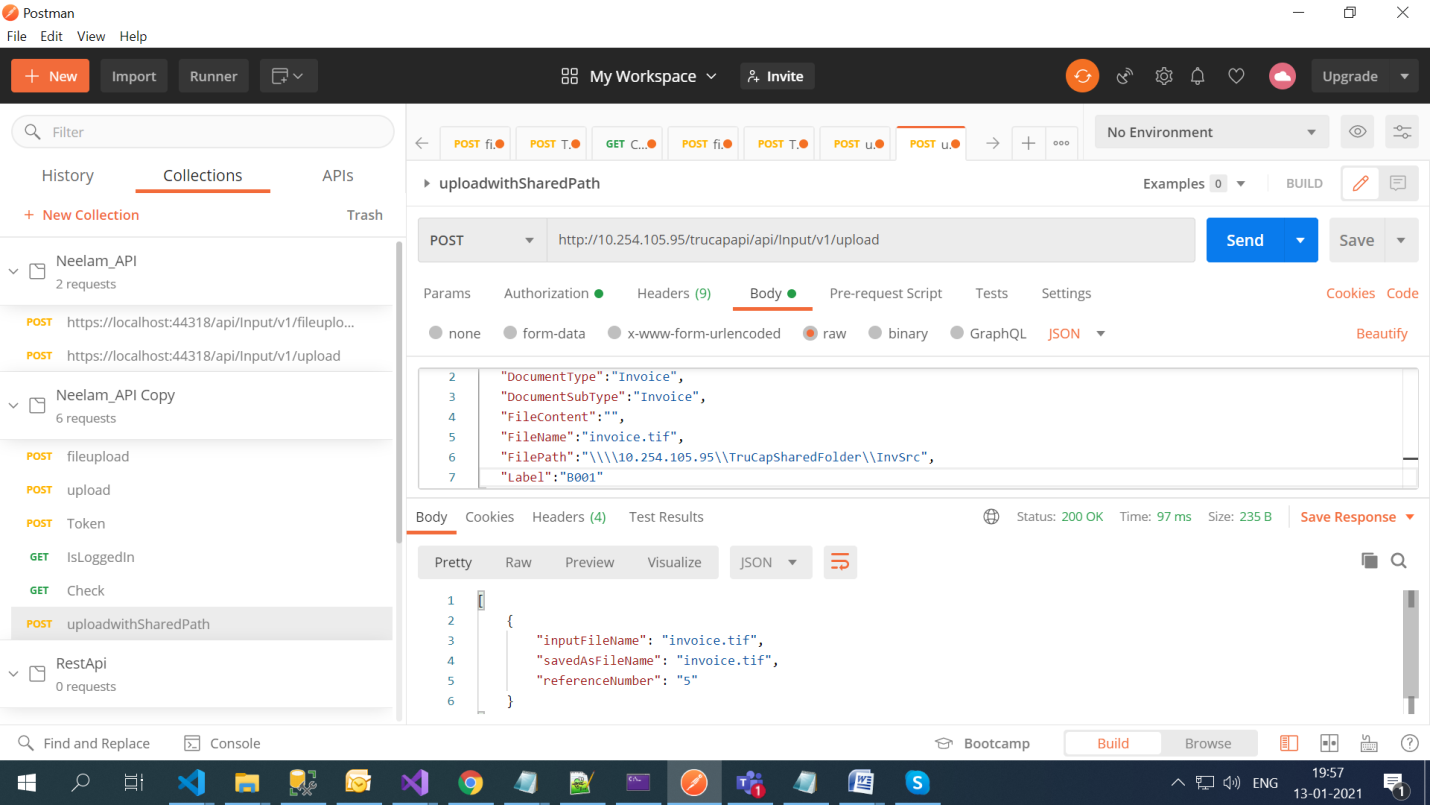
|
FIELD |
DESCRIPTION |
|---|---|
|
Source Folder* |
Auto-populates the input source folder's location path where processed files will be stored. |
|
Processed Folder* |
Auto-populates the processed folder's location path where processed files will be stored. |
|
Exception Folder* |
Auto-populates the exceptional folder's location path where processed files will be stored. |
|
Number of Parallel Tasks* |
Set the number of parallel tasks allowed for downloading files from the input source. Note The default value set is 1; the user can modify it as per requirement. |
|
Task Sleep Time (in milliseconds)* |
Specify the sleep time between successive file downloads. Note The default value set is 1000; the user can modify it as per requirement. The permitted range is between (1000-9999). |
|
Connection Retry Count* |
Set the number of connection retry attempts in case of a connection drop. Note The default value set is 2; the user can modify it as per requirement. |
|
Maximum Connection Attempts* |
Specify the maximum connection attempts before the input source stops connecting. Note The default value set is 2; the user can modify it as per requirement. |
|
Repeat After Period (Minutes)* |
Specify the time interval after which connection retry attempts resume. Note The default value set is 10; the user can modify it as per requirement. |
|
Test connection
|
Click Test Connection link to test the connection. If the connection fails, ensure network availability and review the entered details. |
|
* Mandatory fields |
|
Amazon provides a cloud computing platform. It offers various computing, storage, database management services, and more. TruCap+ supports AWS integration, allowing you to fetch and process files stored in AWS services.
Configuring AWS
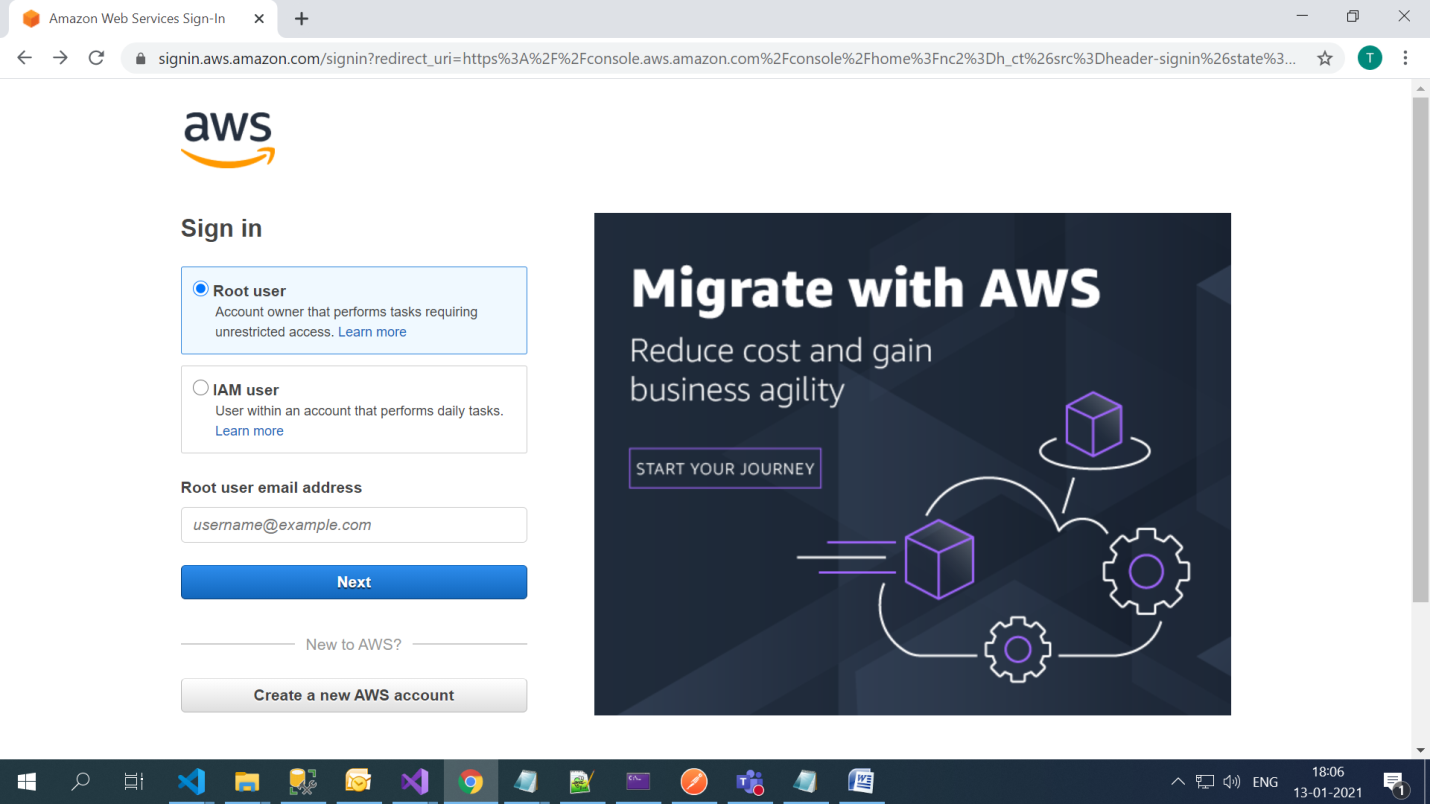
To configure AWS, perform the following steps.
-
Go to AWS and click on Create a new AWS account.

-
Enter the required details and create an AWS account.

-
After an AWS account is created, log in with the credentials.
-
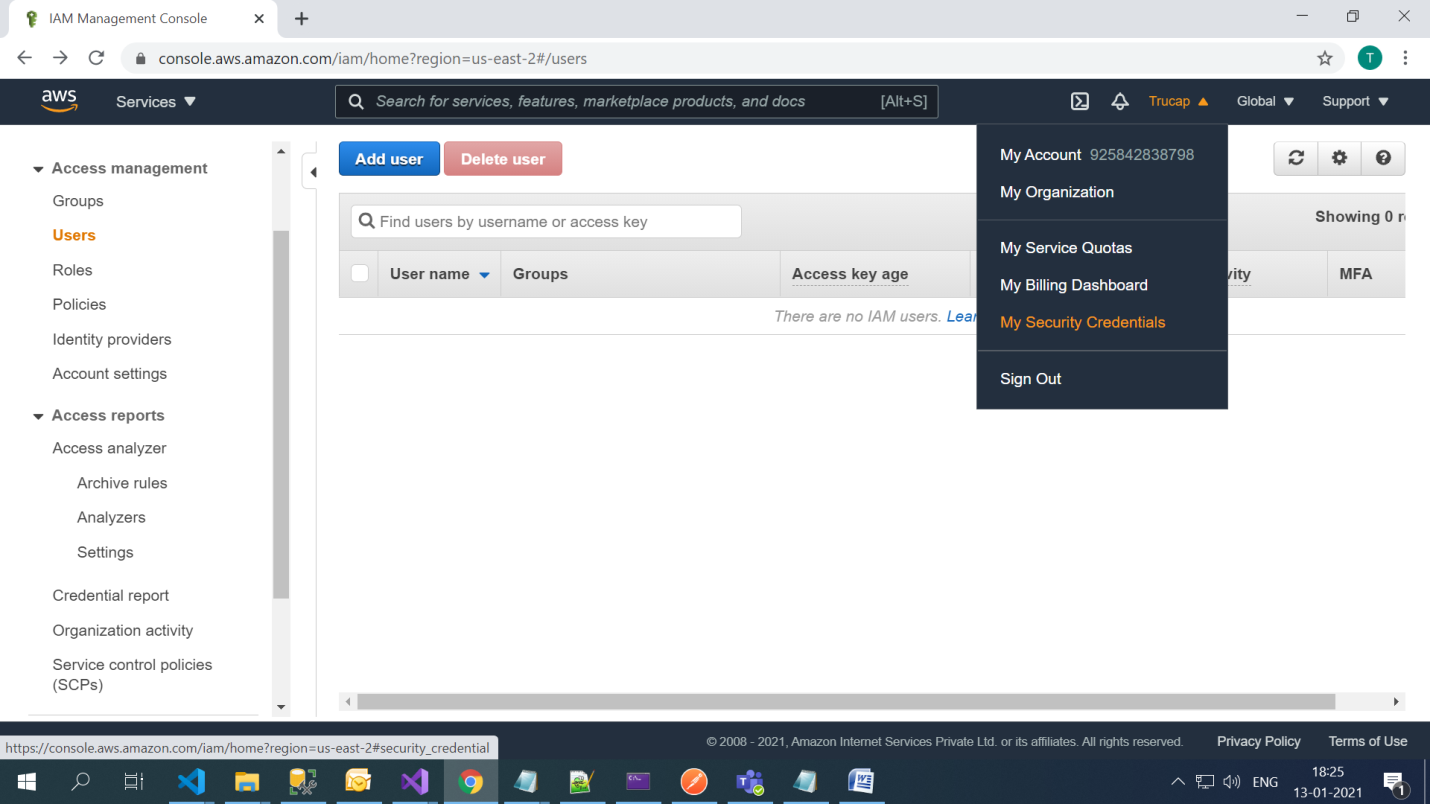
Click on username drop-down and go to My Security Credentials.

-
In Security Credentials, on the left side menu, go to Access Management > Users.

-
Click Add User, fill in the details and select Programmatic access checkbox and click Permissions.

-
Select AmazonS3FullAccess option and click Next.

-
Review the entered details and then click Create User.

-
Once a user is created, an Access key ID and a Secret access key is generated which is required during setting input location. Download the CSV file and Click Close.

-
On the top right corner of the page, click Services > Storage > S3.

-
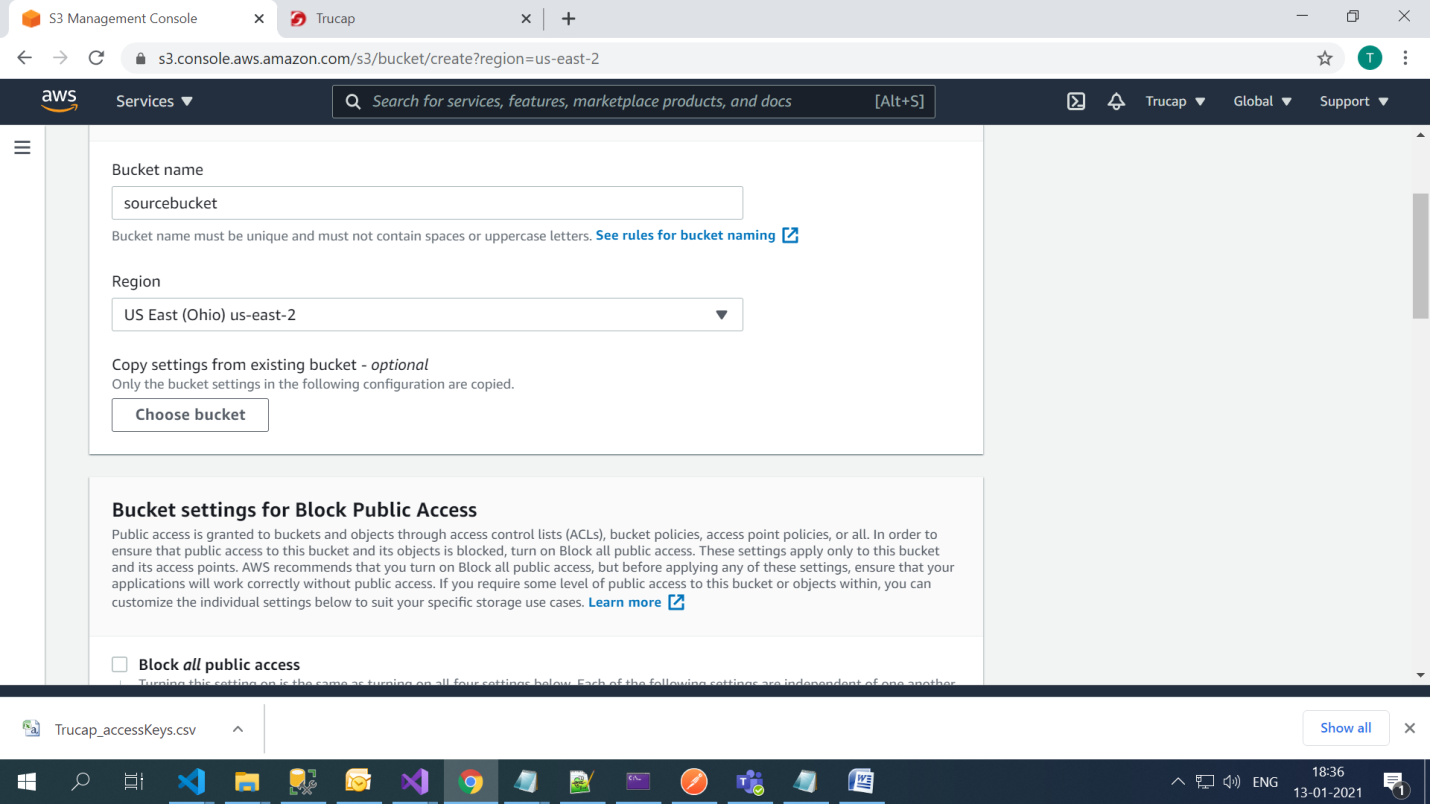
Click Create Bucket and create buckets named as Source, Processed, and Exception.

-
Enter the bucket name, select the region from the drop-down. Under the Bucket Settings for Block Public Access, uncheck the Block off public access option.




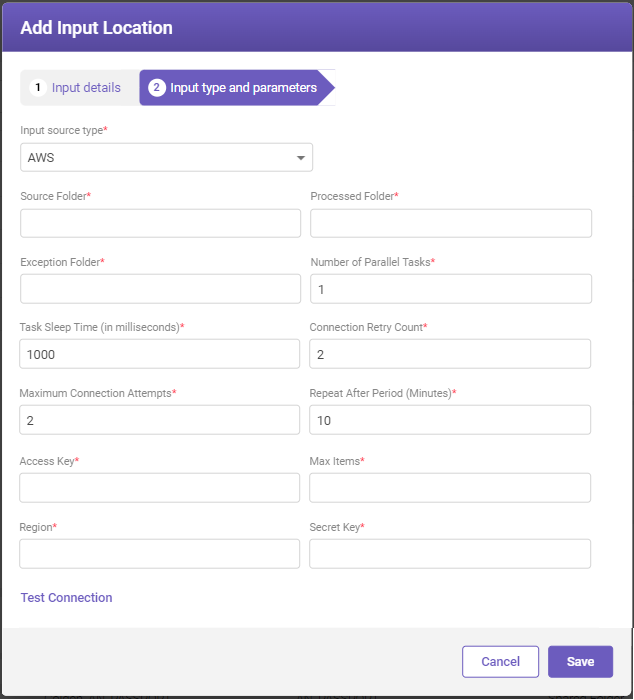
|
FIELD |
DESCRIPTION |
|---|---|
|
Source Folder* |
Enter the input source folder's location path where input files are stored. |
|
Processed Folder* |
Enter the processed folder's location path where processed files will be stored. |
|
Exception Folder* |
Enter the exceptional folder's location path where exceptional files will be stored. |
|
Number of Parallel Tasks* |
Set the number of parallel tasks allowed for downloading files from the input source. Note The default value set is 1; the user can modify it as per requirement. |
|
Task Sleep Time (in milliseconds)* |
Specify the sleep time between successive file downloads. Note The default value set is 1000; the user can modify it as per requirement. The permitted range is between (1000-9999). |
|
Connection Retry Count* |
Set the number of connection retry attempts in case of a connection drop. Note The default value set is 2; the user can modify it as per requirement. |
|
Maximum Connection Attempts* |
Specify the maximum connection attempts before the input source stops connecting. Note The default value set is 2; the user can modify it as per requirement. |
|
Repeat After Period (Minutes)* |
Specify the time interval after which connection retry attempts resume. Note The default value set is 10; the user can modify it as per requirement. |
|
Enter the access key associated with your AWS account. This key is required to authenticate and access the resources in your AWS account. |
|
|
Specify the maximum file count to be picked. This limits the number of files that will be picked up for processing from the source folder. |
|
|
Specify the AWS region for which storage is created. This determines the geographical location of the AWS resources being used. |
|
|
Enter the secret key associated with your AWS account. This key, along with the access key, is used to authenticate and access the resources in your AWS account. |
|
|
Test connection
|
Click Test Connection link to test the connection. If the connection fails, ensure network availability and review the entered details. |
|
* Mandatory fields |
|
Azure is Microsoft's cloud computing platform that provides various cloud services, including computing, analytics, storage, and networking. TruCap+ enables you to integrate with Azure services to fetch and process files.
Note:
Azure BLOBs don't work as a file system where a folder is a separate entity, even if a file doesn't exist in that folder.
Until and unless a file is placed in Azure BLOB, the folder itself doesn't exist and hence is not visible in Azure File Explorer.
While working from the code, the Input and Output service will still work even if the folder is not created. A mandatory requirement is that a BLOB container should exist.
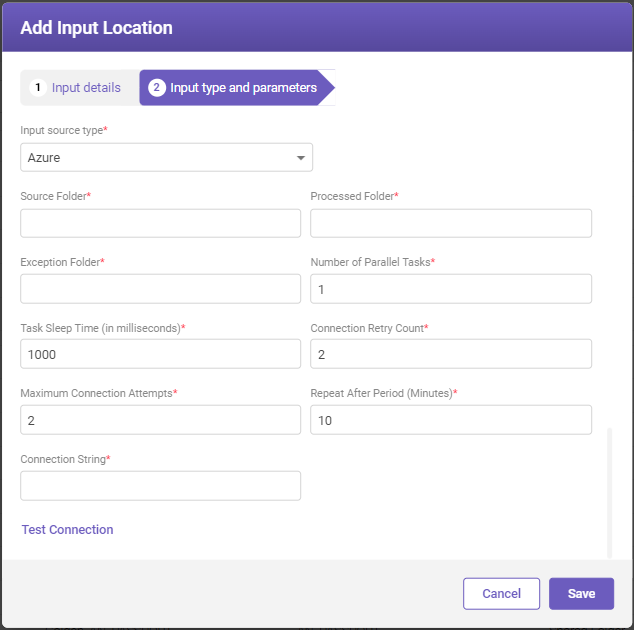
|
FIELD |
DESCRIPTION |
|---|---|
|
Source Folder* |
Enter the input source folder's location path where input files are stored. |
|
Processed Folder* |
Enter the processed folder's location path where processed files will be stored. |
|
Exception Folder* |
Enter the exceptional folder's location path where exceptional files will be stored. |
|
Number of Parallel Tasks* |
Set the number of parallel tasks allowed for downloading files from the input source. Note The default value set is 1; the user can modify it as per requirement. |
|
Task Sleep Time (in milliseconds)* |
Specify the sleep time between successive file downloads. Note The default value set is 1000; the user can modify it as per requirement. The permitted range is between (1000-9999). |
|
Connection Retry Count* |
Set the number of connection retry attempts in case of a connection drop. Note The default value set is 2; the user can modify it as per requirement. |
|
Maximum Connection Attempts* |
Specify the maximum connection attempts before the input source stops connecting. Note The default value set is 2; the user can modify it as per requirement. |
|
Repeat After Period (Minutes)* |
Specify the time interval after which connection retry attempts resume. Note The default value set is 10; the user can modify it as per requirement. |
|
Enter the connection string required to establish a connection to the database. The connection string contains the necessary information to locate and authenticate with the database server. |
|
|
Test connection
|
Click Test Connection link to test the connection. If the connection fails, ensure network availability and review the entered details. |
|
* Mandatory fields |
|
A Client Rest API refers to a Rest API provided by a specific client or service. TruCap+ can interact with client-specific Rest APIs to retrieve data and files for processing, offering flexibility in integration.
Note:
In Rest API the request is sent to the input source location as compared to Client Rest API where the request is sent to the client API to fetch the source location.
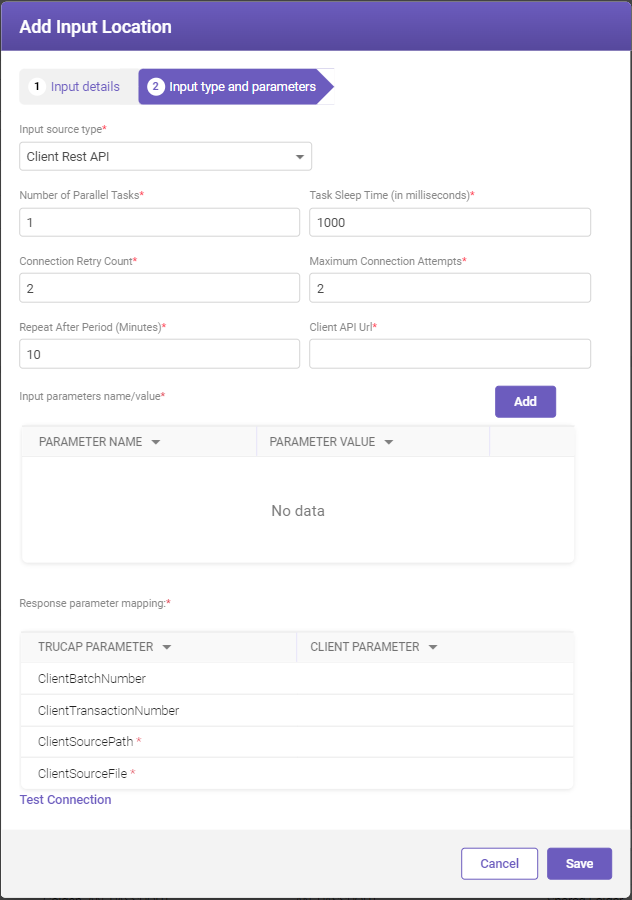
|
FIELD |
DESCRIPTION |
|---|---|
|
Number of Parallel Tasks* |
Set the number of parallel tasks allowed for downloading files from the input source. Note The default value set is 1; the user can modify it as per requirement. |
|
Task Sleep Time (in milliseconds)* |
Specify the sleep time between successive file downloads. Note The default value set is 1000; the user can modify it as per requirement. The permitted range is between (1000-9999). |
|
Connection Retry Count* |
Set the number of connection retry attempts in case of a connection drop. Note The default value set is 2; the user can modify it as per requirement. |
|
Maximum Connection Attempts* |
Specify the maximum connection attempts before the input source stops connecting. Note The default value set is 2; the user can modify it as per requirement. |
|
Repeat After Period (Minutes)* |
Specify the time interval after which connection retry attempts resume. Note The default value set is 10; the user can modify it as per requirement. |
|
Enter the URL to access the client API. This URL will be provided by the client and is used to communicate with the client's API service. |
|
|
Input parameters name/value* |
Specify parameter names and their corresponding values that need to be provided as input to the client API. Note Document sub-type is a hidden parameter and is sent automatically. Adding input parameters name/value
1. Click
Note: Click |
|
Response parameter mapping* |
Map the parameter names available in the response received from the client API to the application-defined fields. These fields include: ClientBatchNumber: Batch number associated with the file to be processed. ClientTransactionNumber: Client transaction number associated with the file. ClientSourcePath*: Path from where the file is fetched for processing. ClientSourceFile*: File name with extension that is to be picked for processing. |
|
Test connection |
Click Test Connection link to test the connection. If the connection fails, ensure network availability and review the entered details. |
|
* Mandatory fields |
|
 to add the input parameter names and values as shown in below image.
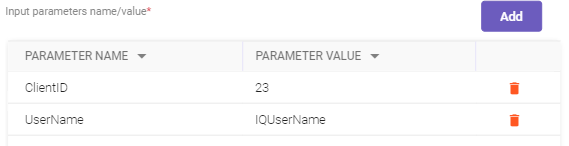
 if you want to delete any parameter name/value.
OneDrive is a Microsoft file hosting and synchronization service similar to Google Drive. TruCap+ can be configured to work with OneDrive as an input source to access and process files.
Configuring OneDrive
Note:
-
User must have OneDrive access under Office 365 (a business license – that includes permission to use Sharepoint).
Login to Office 365 and try to access OneDrive (if your user has rights, you will able to see; otherwise OneDrive option won't be visible).

-
Users can also enable OneDrive on their system (see the image below).

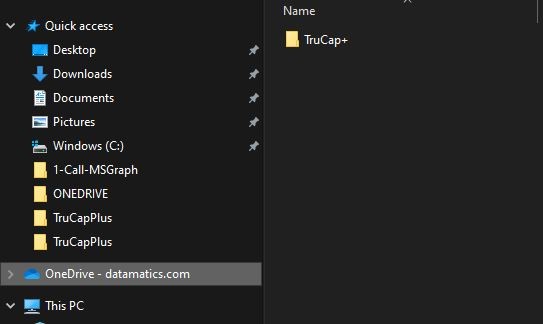
Note: App registration requires a valid account on the Azure portal with access to Active Directory.
To create App on Azure portal, perform the following steps.
-
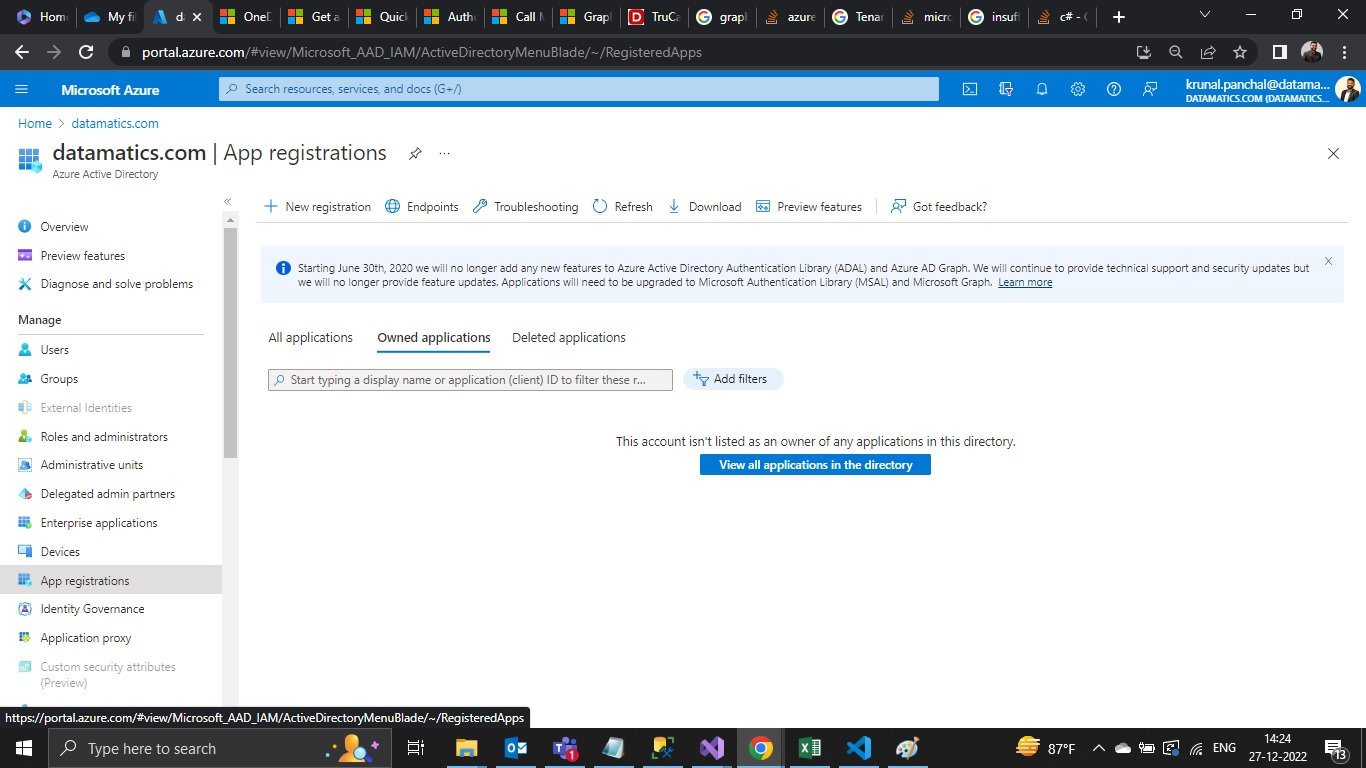
Login to the Azure portal and search for Active Directory (only visible if you have valid access).

-
From the left-side menu of the Azure portal, click App registrations. The App registrations page opens.

-
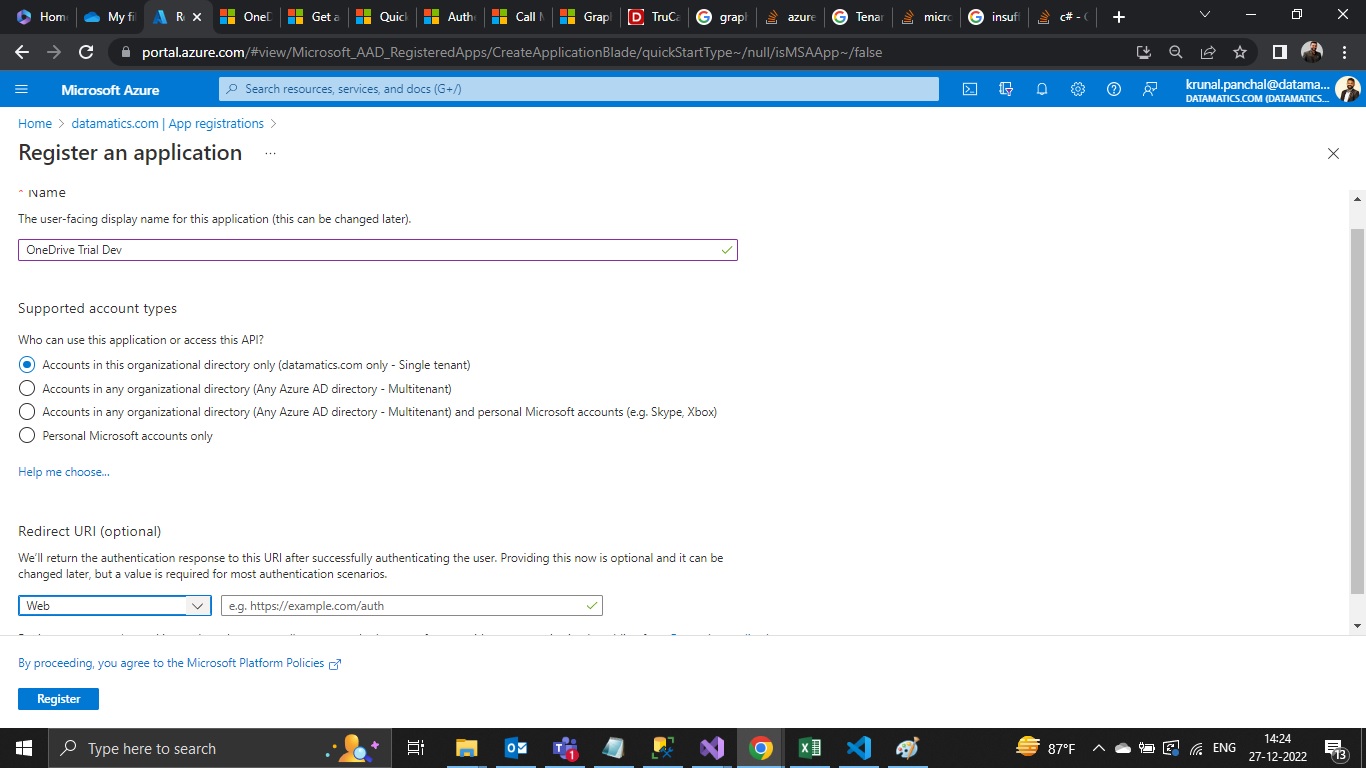
Click New registration. The Register an application page opens.

-
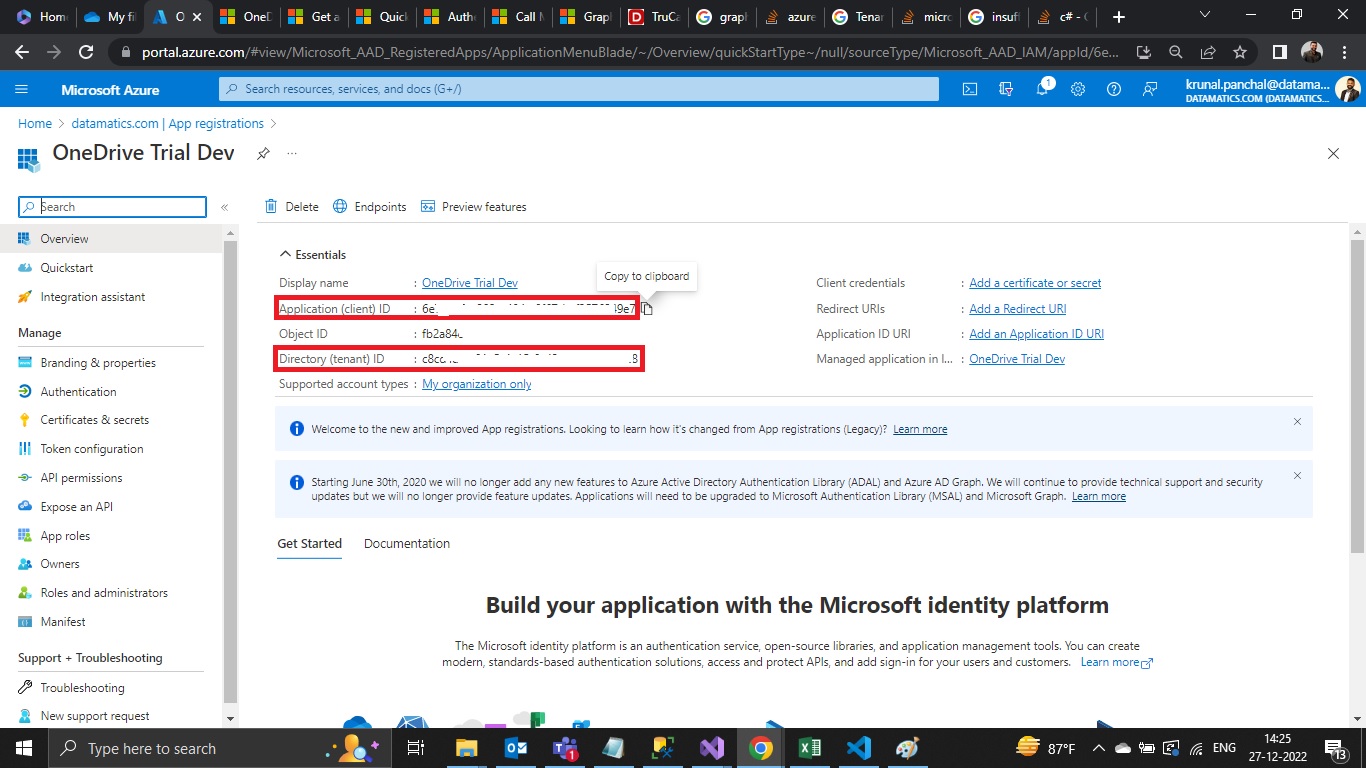
While creating New registration, under Name field, enter the display name. Under Supported account types, select proper Tenant (single/multi-tenant) and under Redirect URI (optional), select Web from the drop-down list (no need to provide any URL, it's optional) and then click Register. The App registration overview page opens.

-
Note the Tenant ID and Client ID required while adding OneDrive as an input/output source.
Providing authentication for created app
-
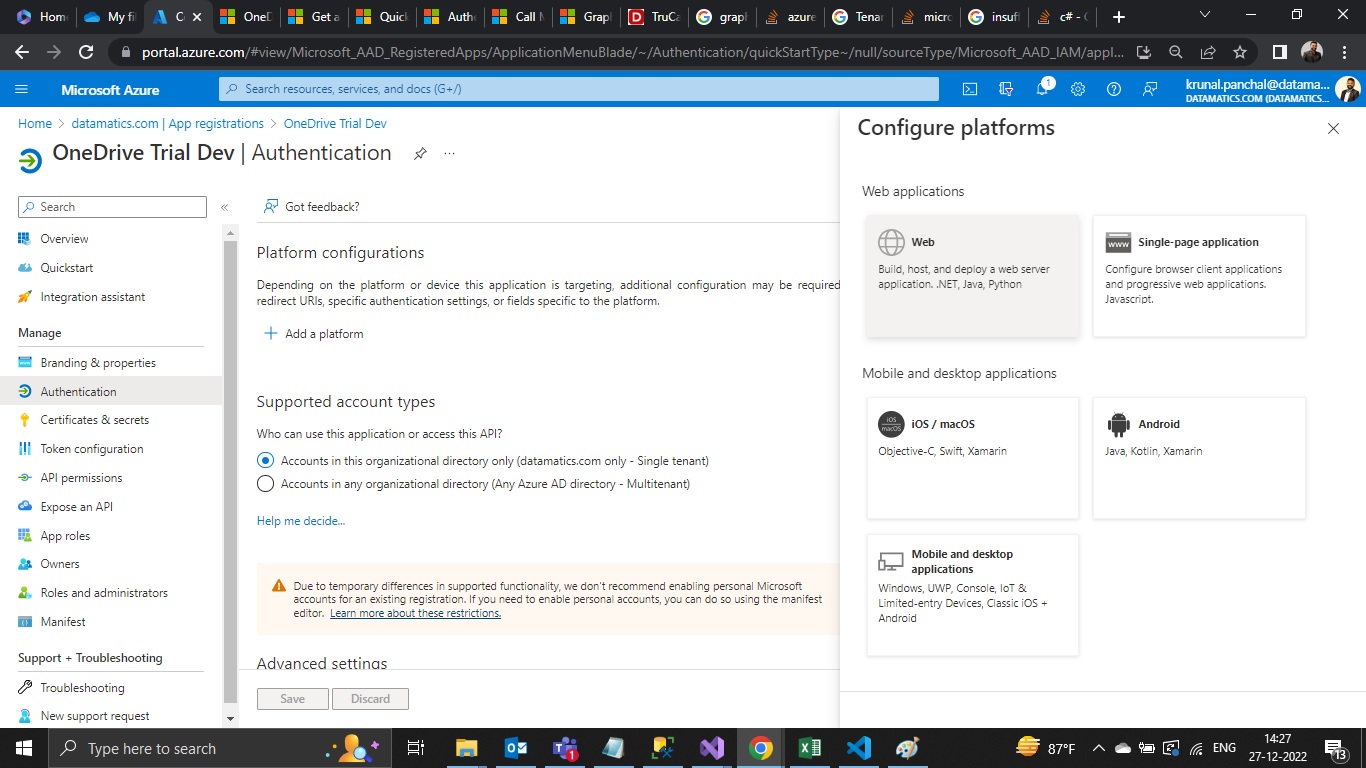
From the left-side menu of the App registration page, click Authentication. The Authentication page opens. Click +Add a platform. The Configure platforms pane opens.

-
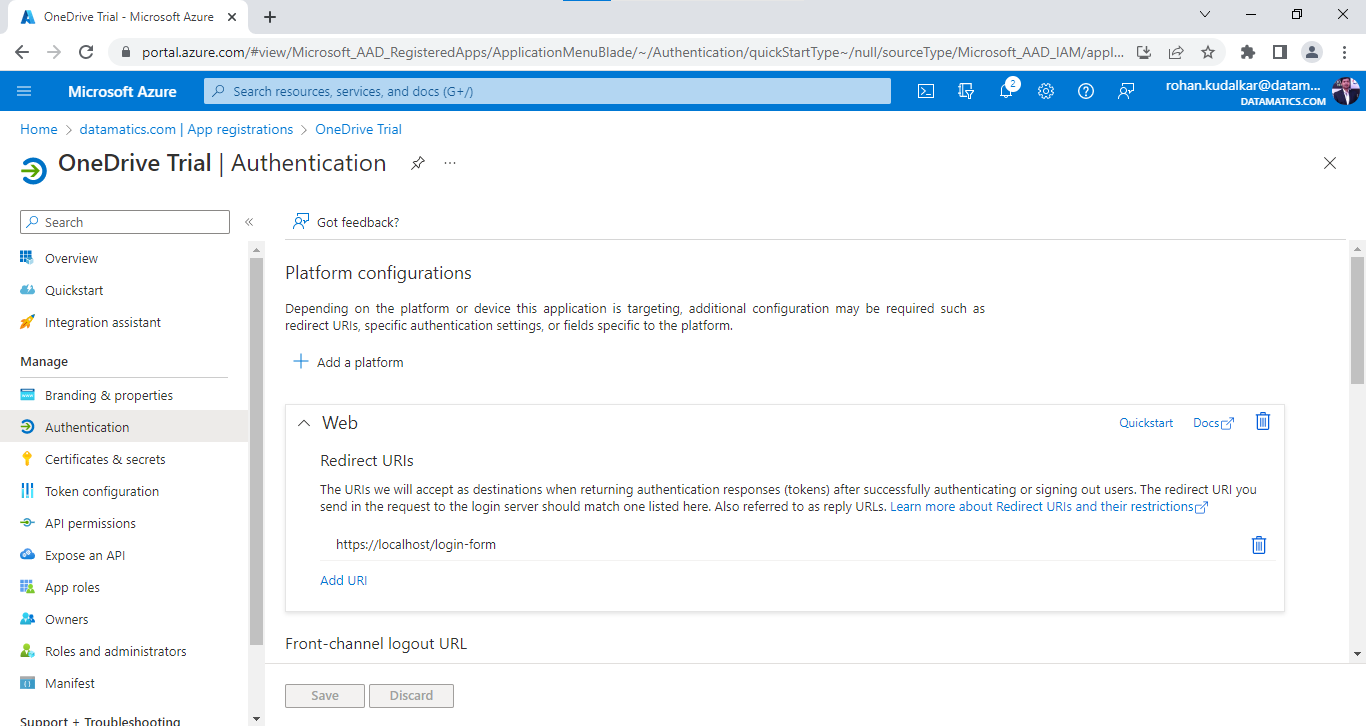
Click on Web. Enter the TruCap+ login URL with https in Redirect URIs and Front-channel logout URL fields, select the ID tokens checkbox, and click Configure.

-
The app is authenticated and shown on the Authentication page (see the image below).

-
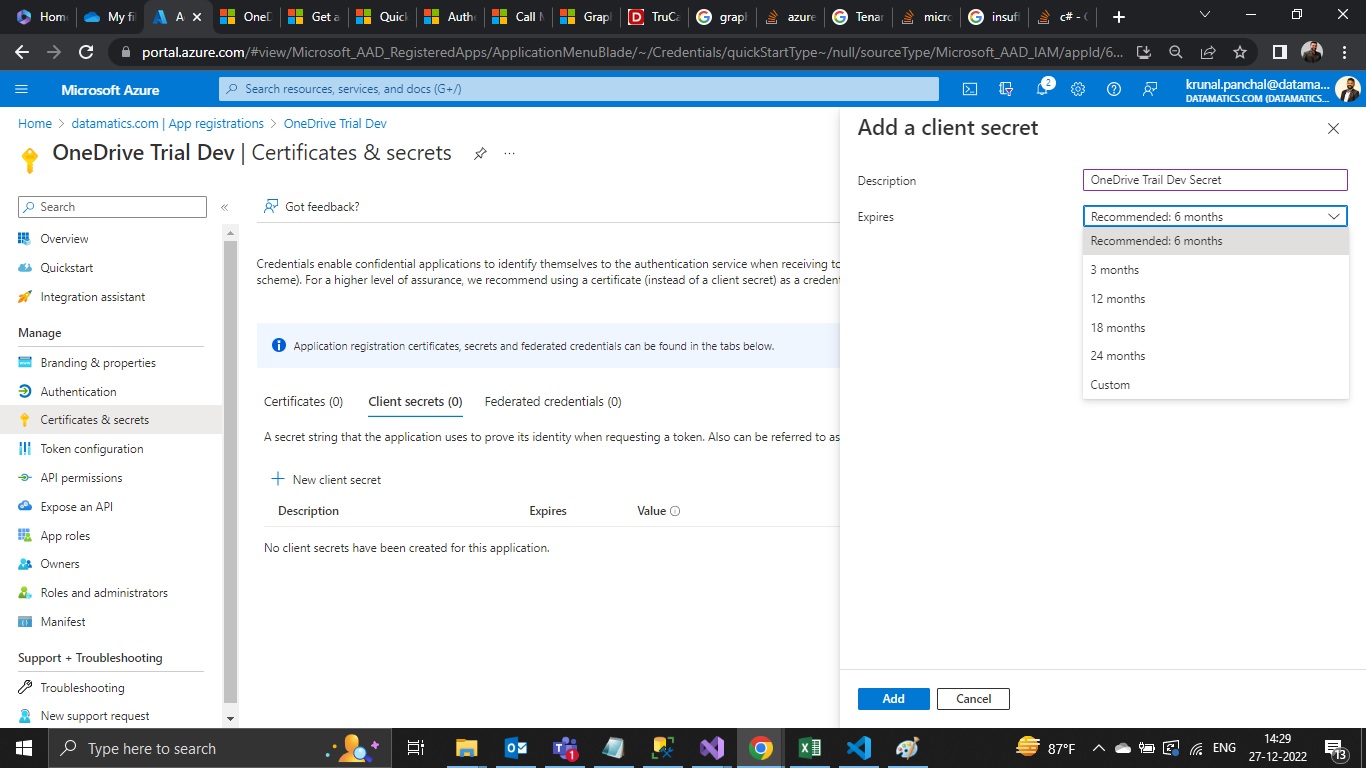
From the left-side menu of the App registration page, click Certificates & secrets. The Certificates & secrets page opens. Click +New client secret. The Add a client secret pane opens.

-
Enter the description in the Description field, select expiry duration from the Expires drop-down list, and click Add. The added client secret is shown on the Certificates & secrets page (see the image below).

Note:
Please note the Value, as once you move away from this page, this value will not be visible, and you will have to repeat steps 9 & 10. This value will be used to pass as Client secret value while adding OneDrive as the Input/Output source.
Adding API permissions
-
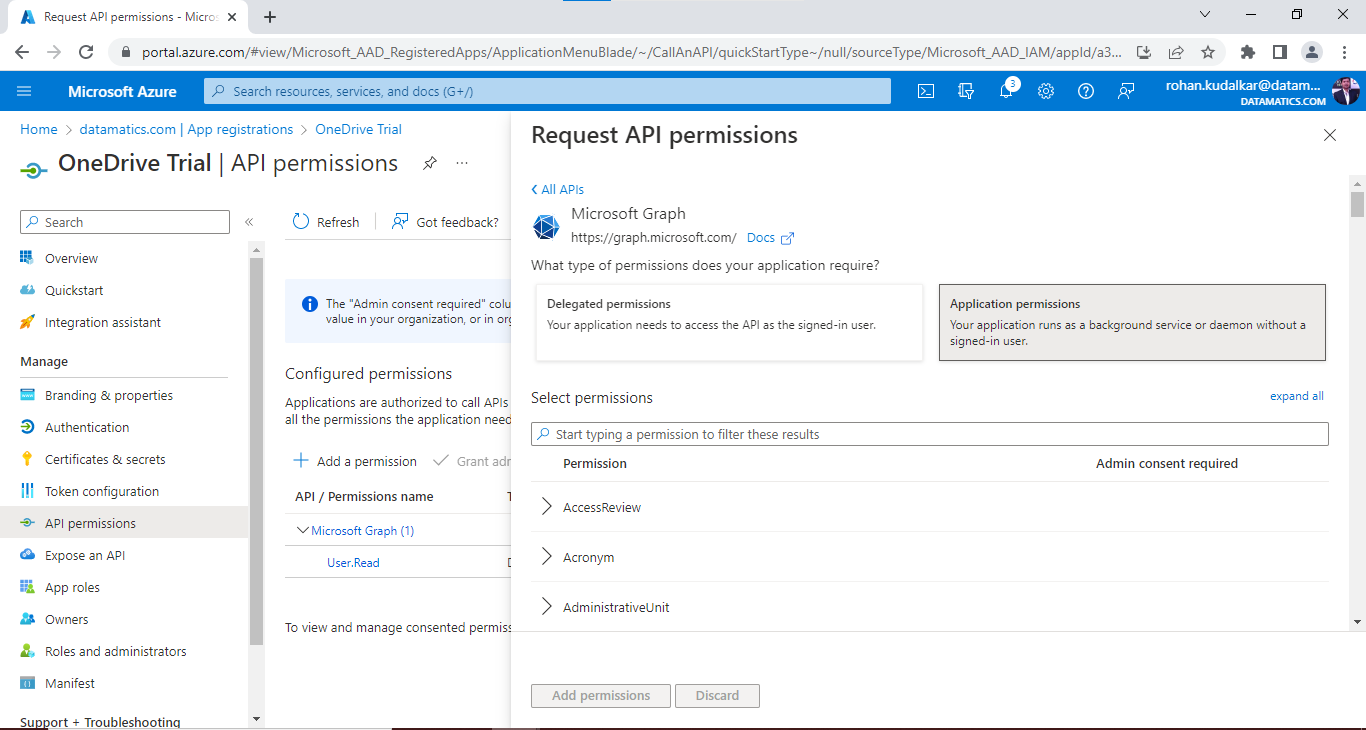
From the left-side menu of the App registration page, click API permissions. The API permissions page opens. Click +Add a permission. The Request API permissions pane opens.

-
Click Microsoft Graph > Application permissions. The Select permissions section opens.

-
Enter Files in the search field and select Files.Read.All and Files.ReadWrite.All options (see the image below).

-
Enter Sites in the search field and select Sites.Read.All and Sites.ReadWrite.All options (see the image below).

-
Click Add permissions. The added permissions are shown on the API permissions page.

Note:
-
The Grant admin consent for tenant option is enabled if you have admin rights. If not, ask the admin (who has all privileges) to grant these permissions.
-
Upon granting permissions, a green tick mark beside each permission is seen (see the image below).

-






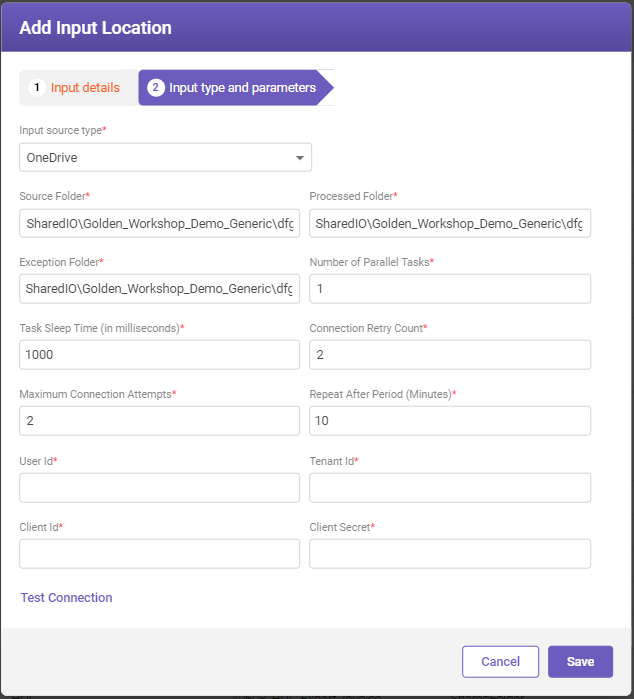
|
FIELD |
DESCRIPTION |
|---|---|
|
Source Folder* |
Auto-populates the input source folder's location path where processed files will be stored. |
|
Processed Folder* |
Auto-populates the processed folder's location path where processed files will be stored. |
|
Exception Folder* |
Auto-populates the exceptional folder's location path where processed files will be stored. |
|
Number of Parallel Tasks* |
Set the number of parallel tasks allowed for downloading files from the input source. Note The default value set is 1; the user can modify it as per requirement. |
|
Task Sleep Time (in milliseconds)* |
Specify the sleep time between successive file downloads. Note The default value set is 1000; the user can modify it as per requirement. The permitted range is between (1000-9999). |
|
Connection Retry Count* |
Set the number of connection retry attempts in case of a connection drop. Note The default value set is 2; the user can modify it as per requirement. |
|
Maximum Connection Attempts* |
Specify the maximum connection attempts before the input source stops connecting. Note The default value set is 2; the user can modify it as per requirement. |
|
Repeat After Period (Minutes)* |
Specify the time interval after which connection retry attempts resume. Note The default value set is 10; the user can modify it as per requirement. |
|
Enter the user id used to log in to OneDrive. |
|
|
Enter the tenant id generated while configuring the application (to be found on App registration> overview page - Application ID). See Configuring OneDrive. |
|
|
Enter the client id generated while configuring the application (to be found on App registration > overview page - Directory ID). See Configuring OneDrive. |
|
|
Enter the client secret generated while configuring the application (to be found on App registration > Certificates & secret page). See Configuring OneDrive. |
|
|
Click Test Connection link to test the connection. If the connection fails, ensure network availability and review the entered details. |
|
|
* Mandatory fields |
|
Microsoft Outlook 365 is an email client and personal information manager. TruCap+ can utilize the capabilities of Outlook 365 to fetch email attachments and process them as input documents.
Note:
-
For the input source, files with more than 4 MB will not get downloaded.
-
For the output source, in the case of the same mail, since there is a limit of a file size of Max 150 MB, hence can only attach output files such as CSV, JSON, and XML.
Configuring MS Outlook 365
Note:
User must have MS Outlook 365 access under Office 365. Login to Office 365 and try to access MS Outlook 365.

Note: App registration requires a valid account on the Azure portal with access to Active Directory.
To create App on Azure portal, perform the following steps.
-
Login to the Azure portal and search for Active Directory (only visible if you have valid access).
-
From the left-side menu of the Azure portal, click App registrations. The App registrations page opens.
-
Click New registration. The Register an application page opens.
-
While creating New registration, under Name field, enter the display name. Under Supported account types, select proper Tenant (single/multi-tenant) and under Redirect URI (optional), select Web from the drop-down list (no need to provide any URL, it's optional) and then click Register. The App registration overview page opens.
-
Note the Tenant ID and Client ID required while adding OneDrive as an input/output source.
Providing authentication for created app
-
From the left-side menu of the App registration page, click Authentication. The Authentication page opens. Click +Add a platform. The Configure platforms pane opens.
-
Click on Web. Enter the TruCap+ login URL with https in Redirect URIs and Front-channel logout URL fields, select the ID tokens checkbox, and click Configure.
-
The app is authenticated and shown on the Authentication page (see the image below).
-
From the left-side menu of the App registration page, click Certificates & secrets. The Certificates & secrets page opens. Click +New client secret. The Add a client secret pane opens.
-
Enter the description in the Description field, select expiry duration from the Expires drop-down list, and click Add. The added client secret is shown on the Certificates & secrets page (see the image below).
Note:
Please note the Value, as once you move away from this page, this value will not be visible, and you will have to repeat steps 9 & 10. This value will be used to pass as Client secret value while adding MS Outlook 365 as the Input/Output source.
Adding API permissions
-
From the left-side menu of the App registration page, click API permissions. The API permissions page opens. Click +Add a permission. The Request API permissions pane opens.
-
Click Microsoft Graph > Application permissions. The Select permissions section opens.
-
Enter Mail in the search field and select Mail.Read, Mail.ReadBasic.All,Mail.ReadWrite, and Mail.Send. All options (see the image below).

-
Enter User in the search field and select User.Read.All option (see the image below).

-
Click Add permissions. The added permissions are shown on the API permissions page.

Note:
-
The Grant admin consent for tenant option is enabled if you have admin rights. If not, ask the admin (who has all privileges) to grant these permissions.
-
Upon granting permissions, a green tick mark beside each permission is seen (see the image below).

Validating app registration and API permission
Graph Explorer has some pre-built API for MS Outlook 365 that helps simulate scenarios (such as Check Mails, Move Mail, Get Mail message, Get Mail attachment, etc.).
To validate app registration and API permissions, perform the following steps.
-
-
Log in to Graph Explorer using the same MS Outlook 365 and Azure portal user id.
-
Once logged in, search MS Outlook 365 from the left navigation pane, and
-
Use GET my profile to verify whether user login is possible.
-
Use GET My Mail to verify that the required consent is granted and able to retrieve the mail list for the signed user.
-


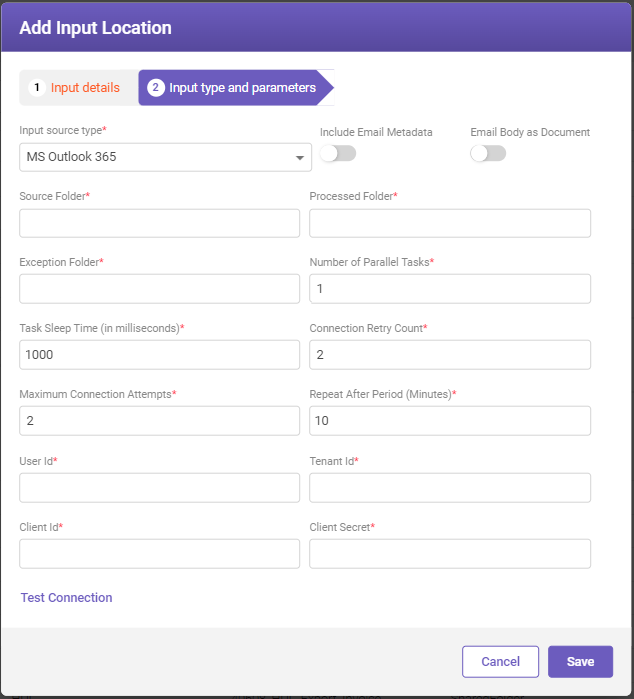
|
FIELD |
DESCRIPTION |
|---|---|
|
Include Email Metadata |
Enabling this toggle button results in the generation of a separate email metadata file in CSV format along with the output file. This email metadata file includes information such as sender name, subject, email body. |
|
Email Body as Document |
Enabling this toggle button treats the email body, which may contain a document, as a separate document to be processed further. Note
|
|
Source Folder* |
Enter the input source folder's location path where input files are stored. |
|
Processed Folder* |
Enter the processed folder's location path where processed files will be stored. |
|
Exception Folder* |
Enter the exceptional folder's location path where exceptional files will be stored. |
|
Number of Parallel Tasks* |
Set the number of parallel tasks allowed for downloading files from the input source. Note The default value set is 1; the user can modify it as per requirement. |
|
Task Sleep Time (in milliseconds)* |
Specify the sleep time between successive file downloads. Note The default value set is 1000; the user can modify it as per requirement. The permitted range is between (1000-9999). |
|
Connection Retry Count* |
Set the number of connection retry attempts in case of a connection drop. Note The default value set is 2; the user can modify it as per requirement. |
|
Maximum Connection Attempts* |
Specify the maximum connection attempts before the input source stops connecting. Note The default value set is 2; the user can modify it as per requirement. |
|
Repeat After Period (Minutes)* |
Specify the time interval after which connection retry attempts resume. Note The default value set is 10; the user can modify it as per requirement. |
|
Enter the user id used to log in to MS Outlook 365. |
|
|
Enter the tenant id generated while configuring the application (to be found on App registration> overview page - Application ID). See Configuring MS Outlook 365. |
|
|
Enter the client id generated while configuring the application (to be found on App registration > overview page - Directory ID). See Configuring MS Outlook 365. |
|
|
Enter the client secret generated while configuring the application (to be found on App registration > Certificates & secret page). See Configuring MS Outlook 365. |
|
|
Click Test Connection link to test the connection. If the connection fails, ensure network availability and review the entered details. |
|
|
* Mandatory fields |
|
Note:
Whenever changes are made to an input source, follow these guidelines for the changes to take effect:
-
Disable the input source that you've modified.
-
Wait for the duration specified in the service refresh time interval.
-
After the waiting period, either enable the input source again or restart the input source service to ensure that the modifications are applied effectively.
To edit an input locations, follow these steps:
-
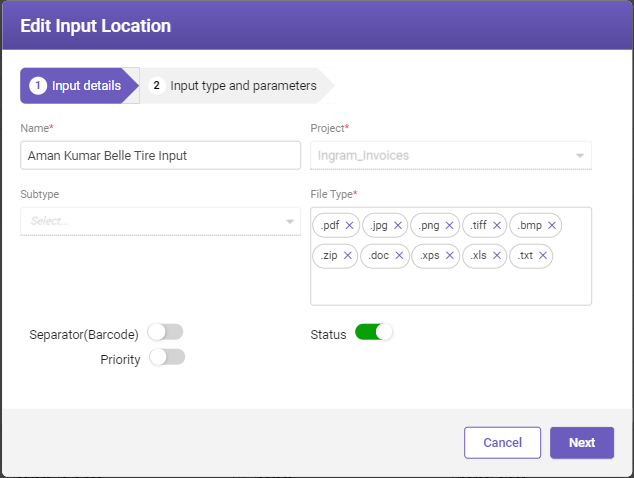
Navigate to the Input tab within the Input /Output Setup page. Select the input name whose details you need to modify and click the Edit button to modify the details. The Edit Input Location window opens.

-
Modify the required details within the Input details section and proceed by clicking the Next button.
-
On the Input Type and Parameters tab, you can further modify the input parameters and settings as needed.
-
After making the necessary modifications to both the input details and input type and parameters, click the Save button to apply the changes.
The Adding Rules for Input Source feature empowers users to efficiently import files from a specific input source and subsequently decide whether to accept or reject these files based on predefined rules associated with the input source type.
To add rules for the input source, follow these steps:
-
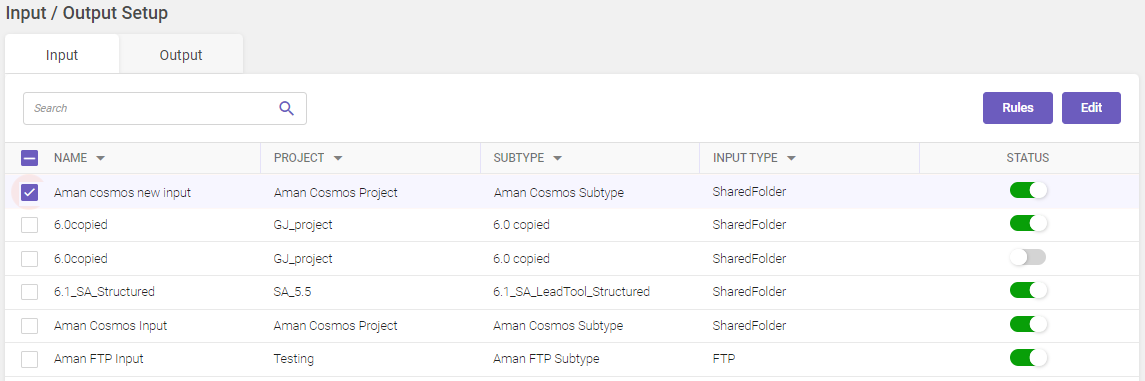
Navigate to the Input tab within the Input /Output Setup page. Select the input name for which you want to add rules, a Rules button is visible at the top-right corner of the page as shown below.

-
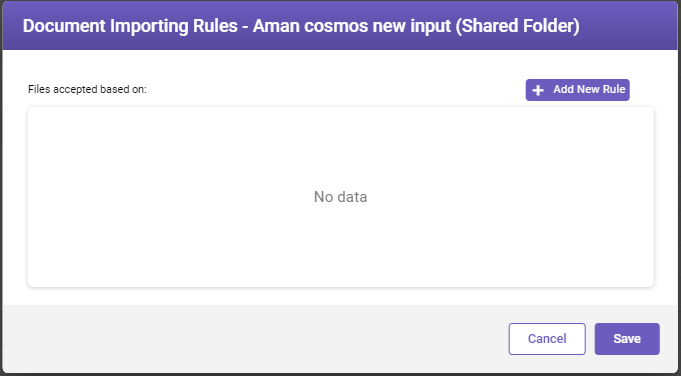
Click on the Rules button to add rules for the selected input location. The Document Importing Rules window opens.

-
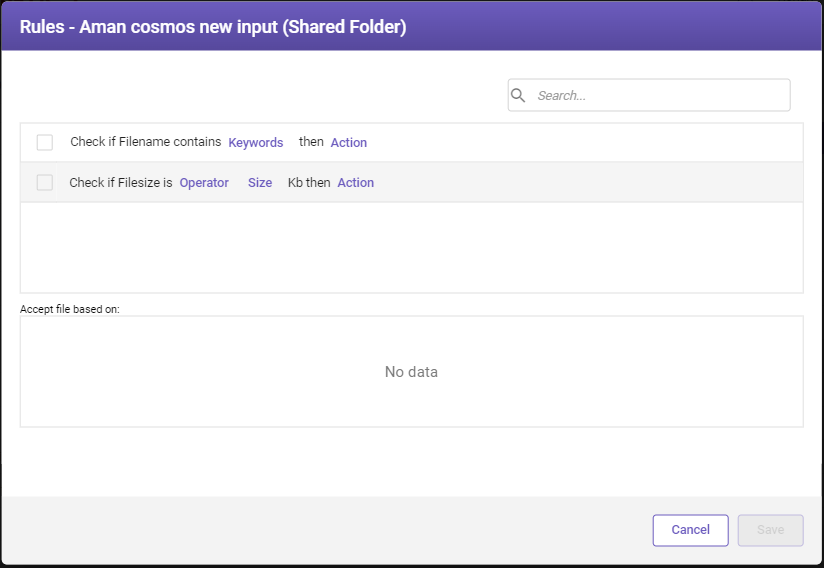
Click on Add New Rule. The Rules window opens.

-
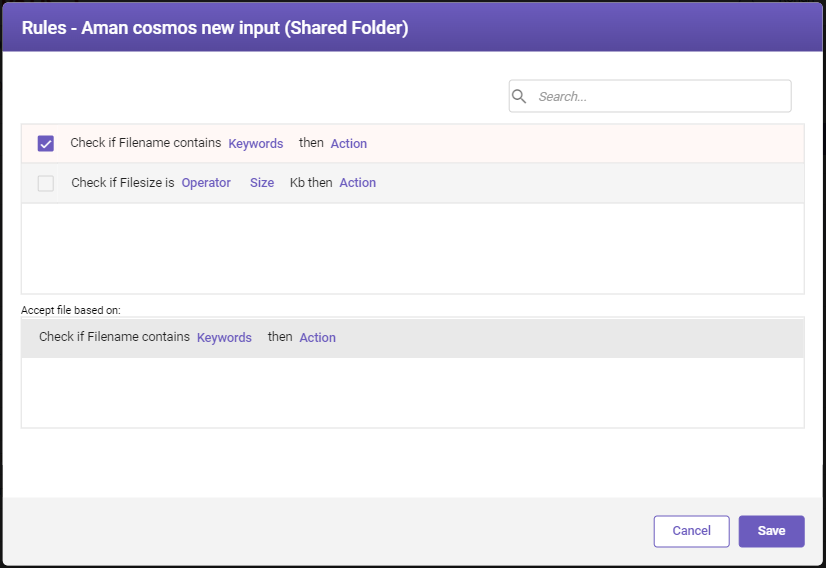
Select the rule to be added from the list of rules. The rule then gets added to the Accept file based on section.

-
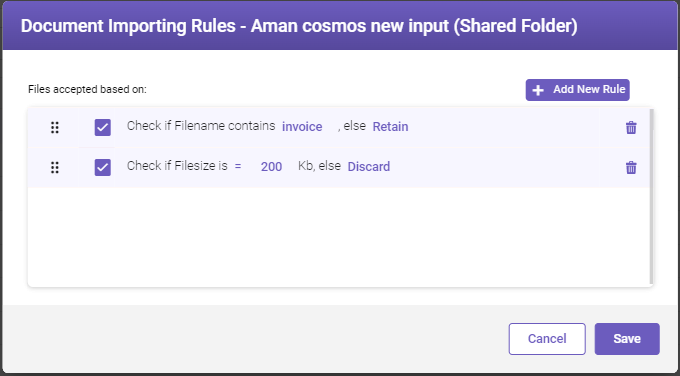
Set the parameters by clicking on the respective parameter name and then click Save. The rule gets added to the Document Importing Rules window as shown below.

-
Click Save to add the rule. Multiple rules can also be added. Click
 icon to delete any rule if required.
Setting output source location
The output location serves as the destination where TruCap+ saves the processed output files after successfully completing the data extraction process. Once the application has processed the documents and extracted the required data, it generates structured and organized output files. For example
To add output locations, follow these steps:
-
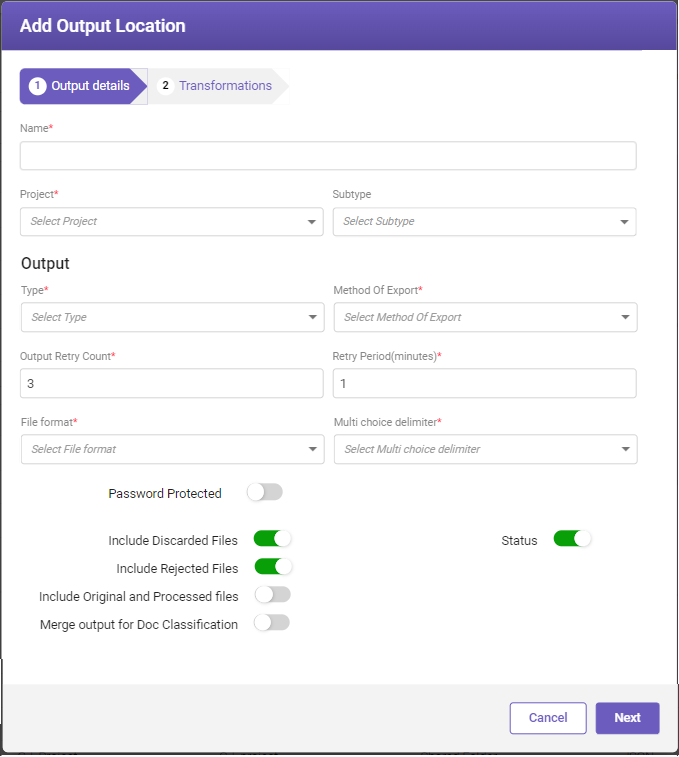
Navigate to the Output tab within the Input / Output Setup page. In the top-right corner of the page, click the Add button to initiate the adding output location process. The Add Output Location window opens with two tabs Output details and Transformations.

-
Under Output details tab, fill-in the details based on the following field descriptions.
FIELD
DESCRIPTION
Name*
Enter the name of the output file. A maximum of 30 characters is permitted for the name.
Select the relevant project name from the drop-down list.
Select the appropriate subtype from the drop-down list.
Output
Type*
Select the required output source type from the drop-down list.
The output sources available are — Google Drive, Email, Dropbox, FTP, Shared folder, Rest API, AWS, Azure, Client Rest API, OneDrive, CMIS, and MS Outlook 365.
Depending on the chosen output source type, different options will be available for configuration, which is listed as follows:
Google Drive
Field options visible are as follows:
-
Destination folder*: Specify the destination folder URL path.
-
Path of credentials. json*: Path of the JSON file that stores the required user credentials to access the Google Drive.
-
Test connection: Link to connect to the server to test the connection. If the connection fails, check the network availability and re-enter the required details.
Refer Google Drive for more information. (* Mandatory Field)
Email
Field options visible are as follows:
-
Email Id*: The email id entered while creating Email input source.
Refer Email for more information. (* Mandatory Field)
Dropbox
Field options visible are as follows:
-
Access token*: Its the access token generated during configuring Dropbox.
-
Destination folder*: Specify the destination folder URL path.
-
Test connection: Link to connect to the server to test the connection. If the connection fails, check the network availability and re-enter the required details.
Refer Dropbox for more information. (* Mandatory Field)
FTP
Field options visible are as follows:
-
Username*: Specify the FTP username.
-
Password*: Specify the FTP password.
-
Host*: Specify the FTP host name.
-
Port*: Specify the FTP port number.
-
Destination folder*: Specify the destination folder URL path.
-
FTP/SFTP*: Select the option from the drop-down list.
-
SSH Host Key Finger Print Required*: Enable the toggle switch for extra layer of security using SSH host key.
-
SSH Host Key Finger Print*: Specify the SSH host key obtained from the SFTP server.
-
Test connection: Link to connect to the server to test the connection. If the connection fails, check the network availability and re-enter the required details.
Refer FTP for more information. (* Mandatory Field)
Shared Folder
Field options visible are as follows:
-
Destination folder*: Specify the destination folder URL path.
-
Export documents in datewise folder: Enable the toggle switch if you want to export documents as per the date of export in the output folder.
-
Test connection: Link to connect to the server to test the connection. If the connection fails, check the network availability and re-enter the required details.
Refer Shared Folder for more information. (* Mandatory Field)
Rest API
Field options visible are as follows:
-
Method of Export*: Document option is automatically selected and is non-editable.
-
File Format*: The output file format option is automatically selected and is non-editable.
-
Test connection: Link to connect to the server to test the connection. If the connection fails, check the network availability and re-enter the required details.
Note
Only one Rest API is allowed for an ontology in the output. If a Rest API output already exists for a subtype, then when the user clicks on Test Connection, a toast message Rest API output is already created for the selected subtype is displayed.
Refer Rest API for more information. (* Mandatory Field)
AWS
Field options visible are as follows:
-
Access Key*: Specify the access key to access AWS account.
-
Max Keys*: Specify the maximum number of key names to be returned in the response.
-
Secret Key*: Specify the secret key to access AWS account.
-
Region*: Specify the region for which storage is created.
-
Destination folder*: Specify the destination folder URL path.
-
Test connection: Link to connect to the server to test the connection. If the connection fails, check the network availability and re-enter the required details.
Refer AWS for more information. (* Mandatory Field)
Azure
Field options visible are as follows:
-
Connection String*: Specify the connection string associated with the Azure storage account that is to be linked with TruCap+.
-
Destination folder*: Specify the destination folder URL path.
-
Test connection: Link to connect to the server to test the connection. If the connection fails, check the network availability and re-enter the required details.
Refer Azure for more information. (* Mandatory Field)
Client Rest API
Field options visible are as follows:
-
Authentication Type*: Select the required authentication type from the drop-down list. Available options are Basic Authentication and MS Dynamics.
-
Send data to URL*: Specify the client URL where you want to send the output file.
-
Username*: Specify the client API username.
-
Password*: Specify the client API password.
-
Authentication URL: Specify the URL required for authentication to access the send data to URL. By default, Authentication URL is non-mandatory.
Note: If Basic Authentication option is selected in Authentication Type, then the Authentication URL field is non-mandatory.
-
Test connection: Link to connect to the server to test the connection. If the connection fails, check the network availability and re-enter the required details.
Refer Client Rest API for more information. (* Mandatory Field)
OneDrive
Field options visible are as follows:
-
Destination folder*: Specify the destination folder URL path.
-
User Id*: Specify the user id used to log in to OneDrive.
-
Tenant Id*: Specify the tenant id generated while configuring the application.
-
Client Id*: Specify the client id generated while configuring the application
-
Client Secret*: Specify the client secret generated while configuring the application
-
Test connection: Link to connect to the server to test the connection. If the connection fails, check the network availability and re-enter the required details.
Refer OneDrive for more information. (* Mandatory Field)
CMIS
Field options visible are as follows:
-
CMIS URL*: Specify the CMIS URL.
-
CMIS Username*: Specify the CMIS username.
-
Password*: Specify the CMIS password.
-
Destination folder*: Specify the destination folder URL path.
-
Test connection: Link to connect to the server to test the connection. If the connection fails, check the network availability and re-enter the required details.
MS Outlook 365
Field options visible are as follows:
-
Destination folder*: Specify the destination folder URL path.
-
User Id*: Specify the user id used to log in to MS Outlook 365.
-
Tenant Id*: Specify the tenant id generated while configuring the application.
-
Client Id*: Specify the client id generated while configuring the application
-
Client Secret*: Specify the client secret generated while configuring the application
-
Test connection: Link to connect to the server to test the connection. If the connection fails, check the network availability and re-enter the required details.
Refer MS Outlook 365 for more information. (* Mandatory Field)
Select the required method of export from the drop-down list.
There are 3 different methods of export, which can be chosen - Bulk, Batch, and Document.
-
Bulk: Indicates bulk of documents to be exported.
-
Batch: Indicates batch of documents to be exported.
-
Document: Indicates a single set of document to be exported.
Note
Depending on the method of export selected, respective method name gets added in the Field Name column under Transformations tab.
Defines the number of times the application will attempt to generate the output.
Note
The default value set is 3; the user can modify it as per requirement. The permitted range is between (1-10).
Retry Period (minutes)*
Specify the time interval (in minutes) after which the application tries to generate the output for a number of times as specified in Output Retry Count* field.
Note
The default value set is 1; the user can modify it as per requirement. The permitted range is between (1-5).
Select the output file format from the drop-down list. The options available are JSON, CSV, XML, and STRUCTURED JSON.
If you select JSON, the following field is available:
-
Include only object: Enable the toggle switch to only include objects in the JSON output.
If you select CSV, the following fields are available:
-
Row delimiter: Select the type of delimiter specific for rows from the drop-down list.
-
Column delimiter: Select the type of delimiter specific for columns from the drop-down list.
-
Enclose value in double quotes: Enable the toggle switch if you want each field name and value to be enclosed in double quotes in the output file.
If you select XML, the following fields are available:
-
Encoding Type: Select the type of encoding from the drop-down list.
-
XML output attribute wise: When you enable the toggle switch, the XML data gets saved in the file in attribute-value format; otherwise, it gets saved in node format.
Multi choice delimiter*
Select the type of delimiter from the drop-down list.
Password Protected
Enable the toggle switch to encrypt the exported output files.
When you enable the toggle switch, the Password and Confirm password text fields are displayed as shown below.

Enter the password of your choice in Password field and retype the same password in Confirm password field. For any incorrect password, a warning icon
 with Password does not match message is displayed.
Include Discarded Files
Enable the toggle button to receive the discarded files data along with the exported files.
Turning off to inactive mode, allows user to receive only the exported files.
Include Rejected Files
Enable the toggle button to receive the rejected files data along with the exported files.
Turning off to inactive mode, allows user to receive only the exported files.
Include Original and Processed files
Enable the toggle switch to include the original file along with the processed file during export.
Merge Output for Doc Classification
Enable the toggle button to merge output at the document type level. Disable it for output to be generated by document subtype wise.
Status
Toggle the button to activate/deactivate output file generation.
76975
Toggle the button to activate/deactivate the automatic export of the document when it is ready for export.
Note: This option is not available for the export of bulk and batch documents. (See method of export.)
Important points
-
Heterogeneous/Integrated projects do not support automatic export of documents.
-
In a document split scenario, the documents are automatically exported only after all the documents are ready for export.
-
If the documents have been quality checked, then the automatic export of the documents is delayed by one minute or more.
-
No export schedule can be created for a document that is to be automatically exported. An existing export schedule for such a document will fail.
-
Multiple export of the same document will happen in case you choose to manually export a document that is to be automatically exported.
* Mandatory fields -

Note:
-
The Test Connection link is not available for Email output source.
-
Output service will be only responsible for creating a file at the local destination from now onwards. The transfer service will pick files ids (docheaderId wise) from Queue, move the file to the destination, and update the export status accordingly.
-
For Rest API as an output type, only one Rest API is allowed for a subtype. If a user selects the output type as Rest API for the chosen subtype (which already contains Rest API as the output type), then a toast message pops up (see the image below).

-
Once you've filled in the output details, click Next to access the Transformations tab.
Note:
It is mandatory to fill in the details for the required fields under the Output details tab to access the Transformations tab.
The Transformations tab is further divided in to Fields and Tables tab.
Click on the buttons inside the tabbed menu to know more.
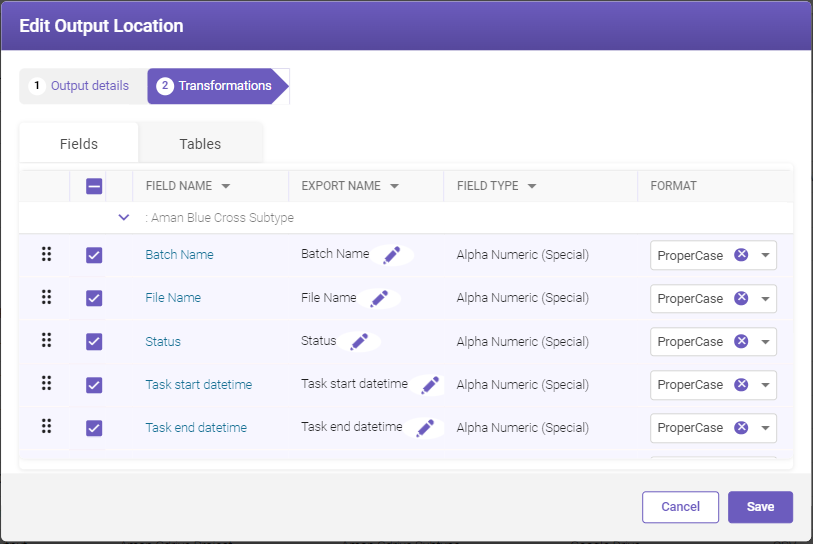
Column header descriptions
|
COLUMN NAME |
DESCRIPTION |
|---|---|
|
Field Name |
Displays the fields associated with the selected subtype in the Output details tab. Note If no subtype is selected, all the fields associated with the subtypes created under the selected project in the Output details tab are displayed under the respective subtype name. |
|
Export Name |
Displays the alternate name that can be set for a field name to be displayed in the exported file. By default, it shows the pre-defined names created while setting up ontology. For more information, refer setting ontology. Renaming a field
To rename a field, click Note: While renaming, if required, you can click the Cancel changes Note If a user updates the field name at the ontology level, the user will also have to manually update the export name set for that particular field name. |
|
Field Type |
Displays the field type associated with the field name. For details about each field type, refer to field types. |
|
Format |
Displays the list of available output field formats as per the field type which a user can configure to export. Select the required output field format from the Format drop-down list. |
 icon. The text field gets highlighted, rename as required.
 icon to delete the changes done.
-
Select the checkbox corresponding to the field name whose information you want to be available in the exported file.
-
Click and drag
 icon up and down to change the field name sequence, if required.
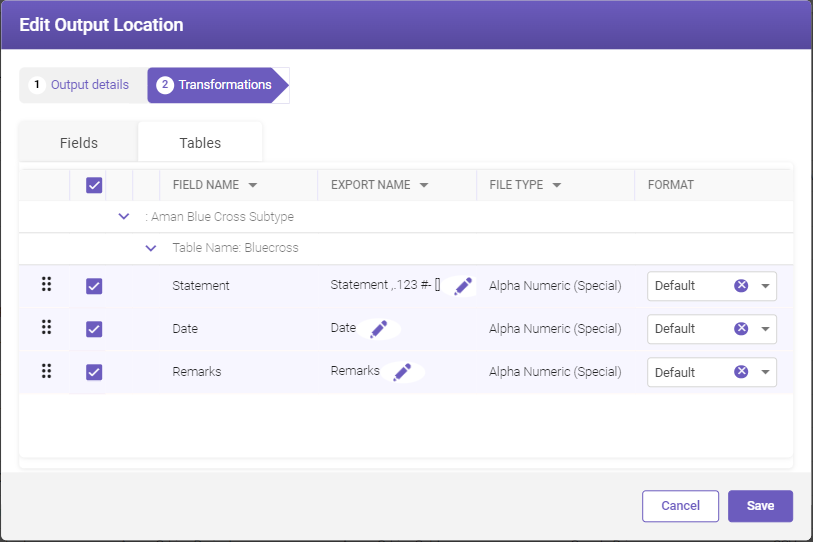
Column header descriptions
|
COLUMN NAME |
DESCRIPTION |
|---|---|
|
Field Name |
Displays the fields associated with the tables created for the selected subtype in the Output details tab. Note If no subtype is selected, all the fields associated with the tables created for all the subtypes created under the selected project in the Output details tab are displayed under the respective subtype name. |
|
Export Name |
Displays the alternate name that can be set for a field name to be displayed in the exported file. By default, it shows the pre-defined names created while setting up ontology. For more information, refer setting ontology. Renaming a field
To rename a field, click Note: While renaming, if required, you can click the Cancel changes |
|
Field Type |
Displays the field type associated with the field name. For details about each field type, refer to field types. |
|
Format |
Displays the list of available output field formats as per the field type which a user can configure to export. Select the required output field format from the Format drop-down list. |
-
Select the checkbox corresponding to the field name whose information you want to be available in the exported file.
-
Click and drag
icon up and down to change the field name sequence, if required.
Click Save to save the changes done.
To edit output location, follow these steps:
-
Navigate to the Output tab within the Input /Output Setup page. Select the output name whose details you need to modify and click the Edit button to modify the details. The Edit Output Location window opens.

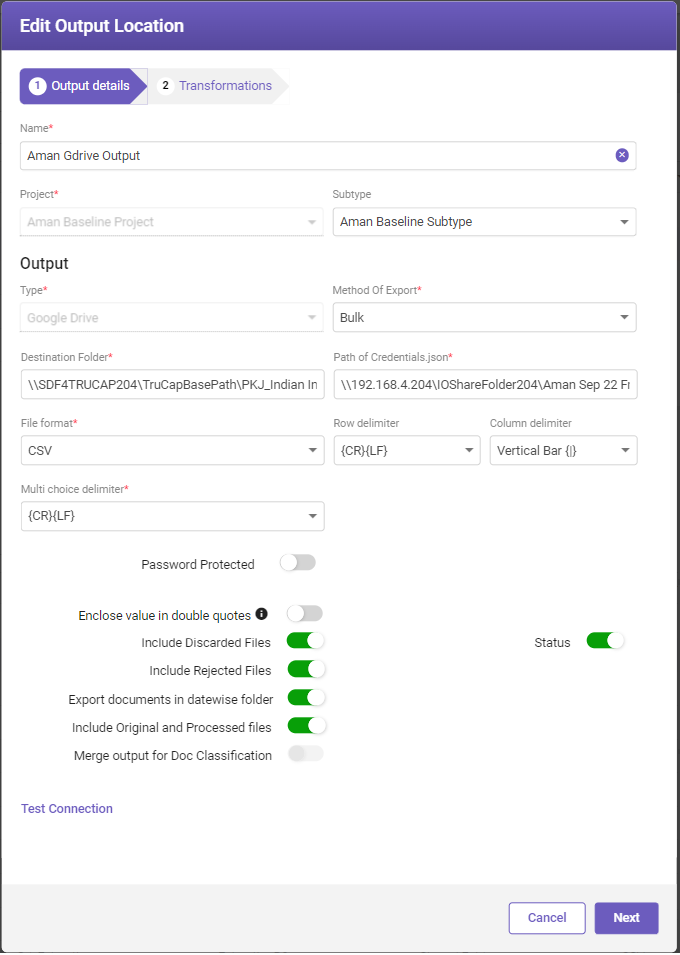
-
Modify the required details within the Output details section and proceed by clicking the Next button.
-
On the Transformations tab, you can further modify the parameters.
-
After making the necessary modifications to both the output details and transformations, click the Save button to apply the changes.
NEXT
Now that you know how have set the input/output locations, let's upload documents.
Useful links